By Rustina
Swollen ankles, calves, and even wrists were causing me a lot of discomfort. I knew I needed to do something, but every time I asked, the advice was the same – just wear compression stockings. With my fingers so swollen too, pulling on a stocking was a feat in itself! That puffy, stiff feeling needed to be dealt with somehow.
We talked about how important the lymphatic system is in this earlier blog. It mentions how the lymphatic system carries away tissue waste and toxins while distributing healthy and much- needed hydration and nutrition throughout the body. We even talked about herbs that can help support it.
Disclaimer here, that I am not a healthcare professional, nor am I diagnosing, treating, or curing anything whatsoever.
If you want to see a healthcare professional concerning lymphatic drainage massage, then reach out to your trusted chiropractor or physical/occupational therapist for more information. Many of them are amazing and can be a great asset, especially if it is in your budget to go that route. There are also massage therapists who have been trained to perform lymphatic drainage.
Now, let’s dive into a DIY lymphatic drainage self-massage!
5 Tips to make the most of a self massage
#1 Drink plenty of water and herbal teas.
#2 Remember to gently massage your skin – like you would a baby kitten.
#3 Do each massage step several times to get the flow going. It is a great relief for congestion so doing this up 2-3 times a day can be a great relief.
#4 Reroute it if needed. If somewhere on your body begins to feel fuller or warmer, then you may have a fluid backup in this area. That is often associated with scar tissue, especially from surgery. You can help move it around by rubbing it around to find a different path. For example, mine gets caught up around my c-section scars, so I rub it out to the sides and then up the back.
#5 Use a cream either during or after that is blended with proven herbs that support lymphatic health and flow, such as Earthley’s all-natural Lymphatic Cream made with Ginger Root (1), Burdock Root (2), Yarrow (3), Calendula (4), Cleavers (5), Castor Oil (6)(7).
How to perform the self massage
The goal is to get things flowing well. That makes it important to know where the main areas of congestion are located. In the case of lymphatic flow, that is likely around the lymph node-heavy areas, so always open up those main centers first.
Priming the system
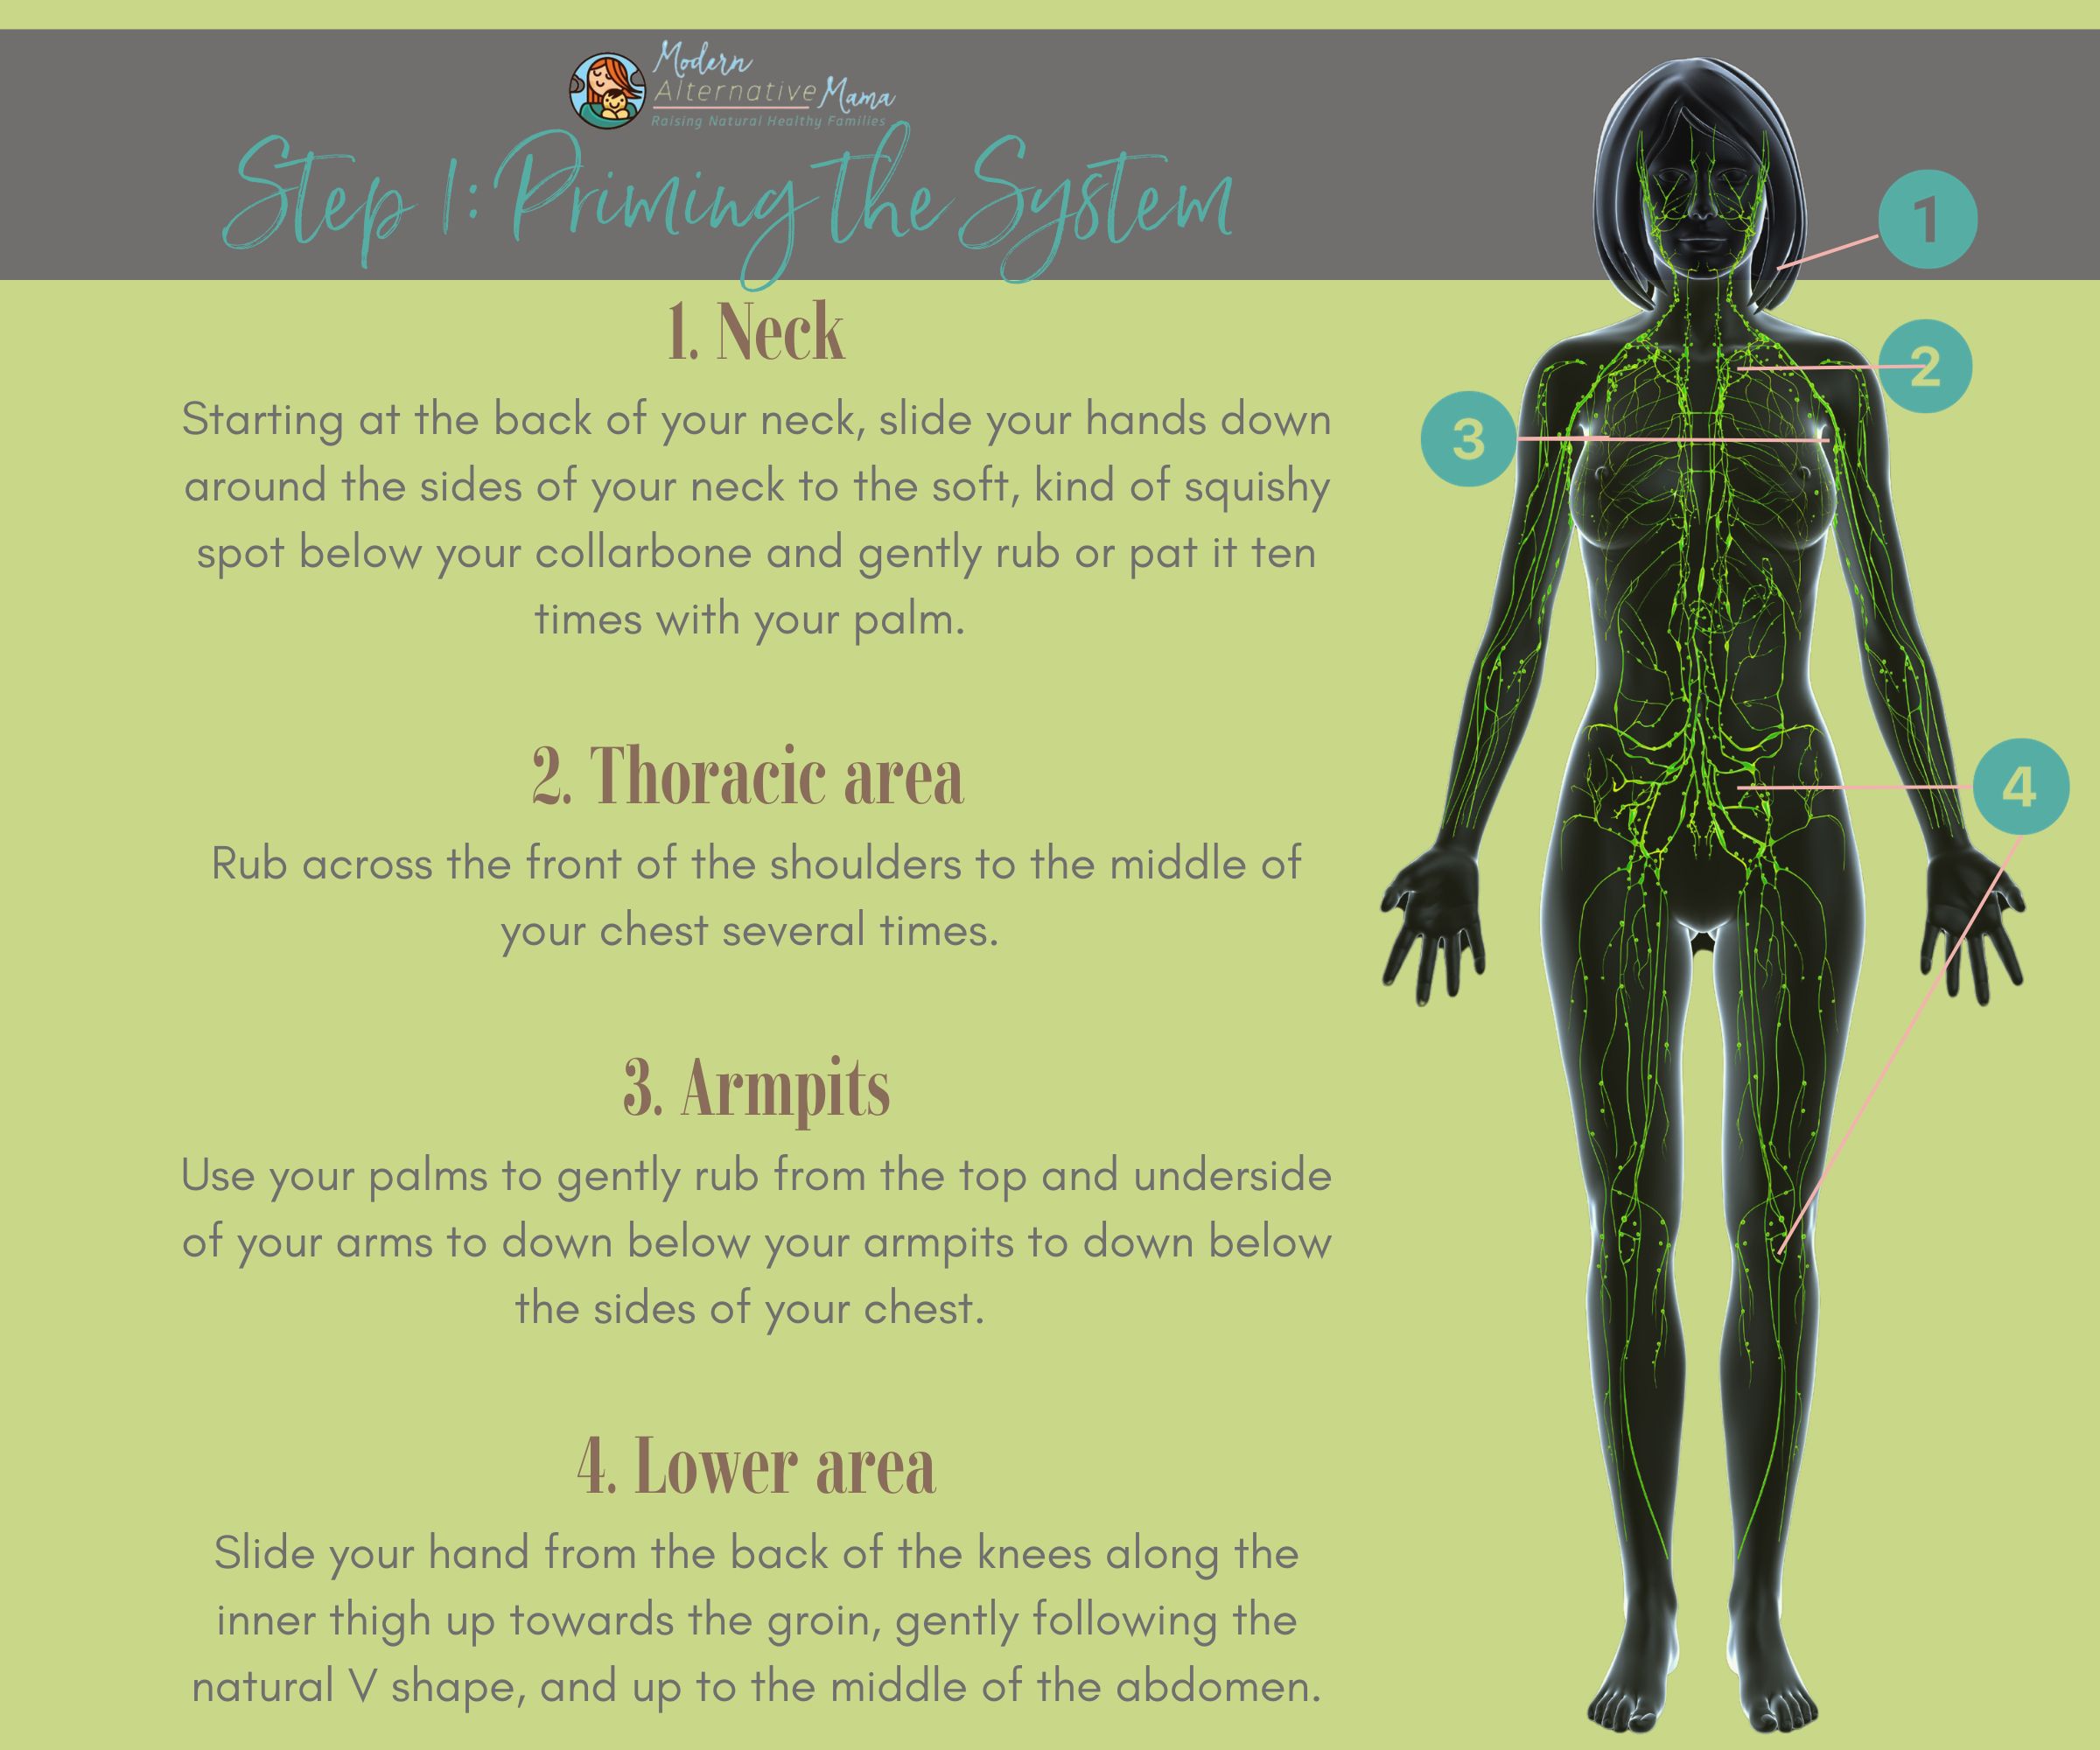
The main lymph drainage is higher in the thoracic area, and the lower one is along the lower end of the spine.
These areas can get “clogged up” easily, so generating flow through them first is very helpful. I generally do each step 5-10 times (10 for the most congested areas).
Main Lymph Node Centers:
- Neck:
- Starting at the back of your neck, slide your hands down around the sides of your neck to the soft, kind of squishy spot below your collarbone and gently rub or pat it ten times with your palm.
- Thoracic area:
- Rub across the front of the shoulders to the middle of your chest several times.
- Armpits:
- Use your palms to gently rub from the top and underside of your arms to down below your armpits to down below the sides of your chest.
- Lower area:
- Slide your hand from the back of the knees along the inner thigh up towards the groin, gently following the natural V shape, and up to the middle of the abdomen.
Moving the fluid
Now that those areas are moving well, it is time to get the outer fluids brought in.
Head
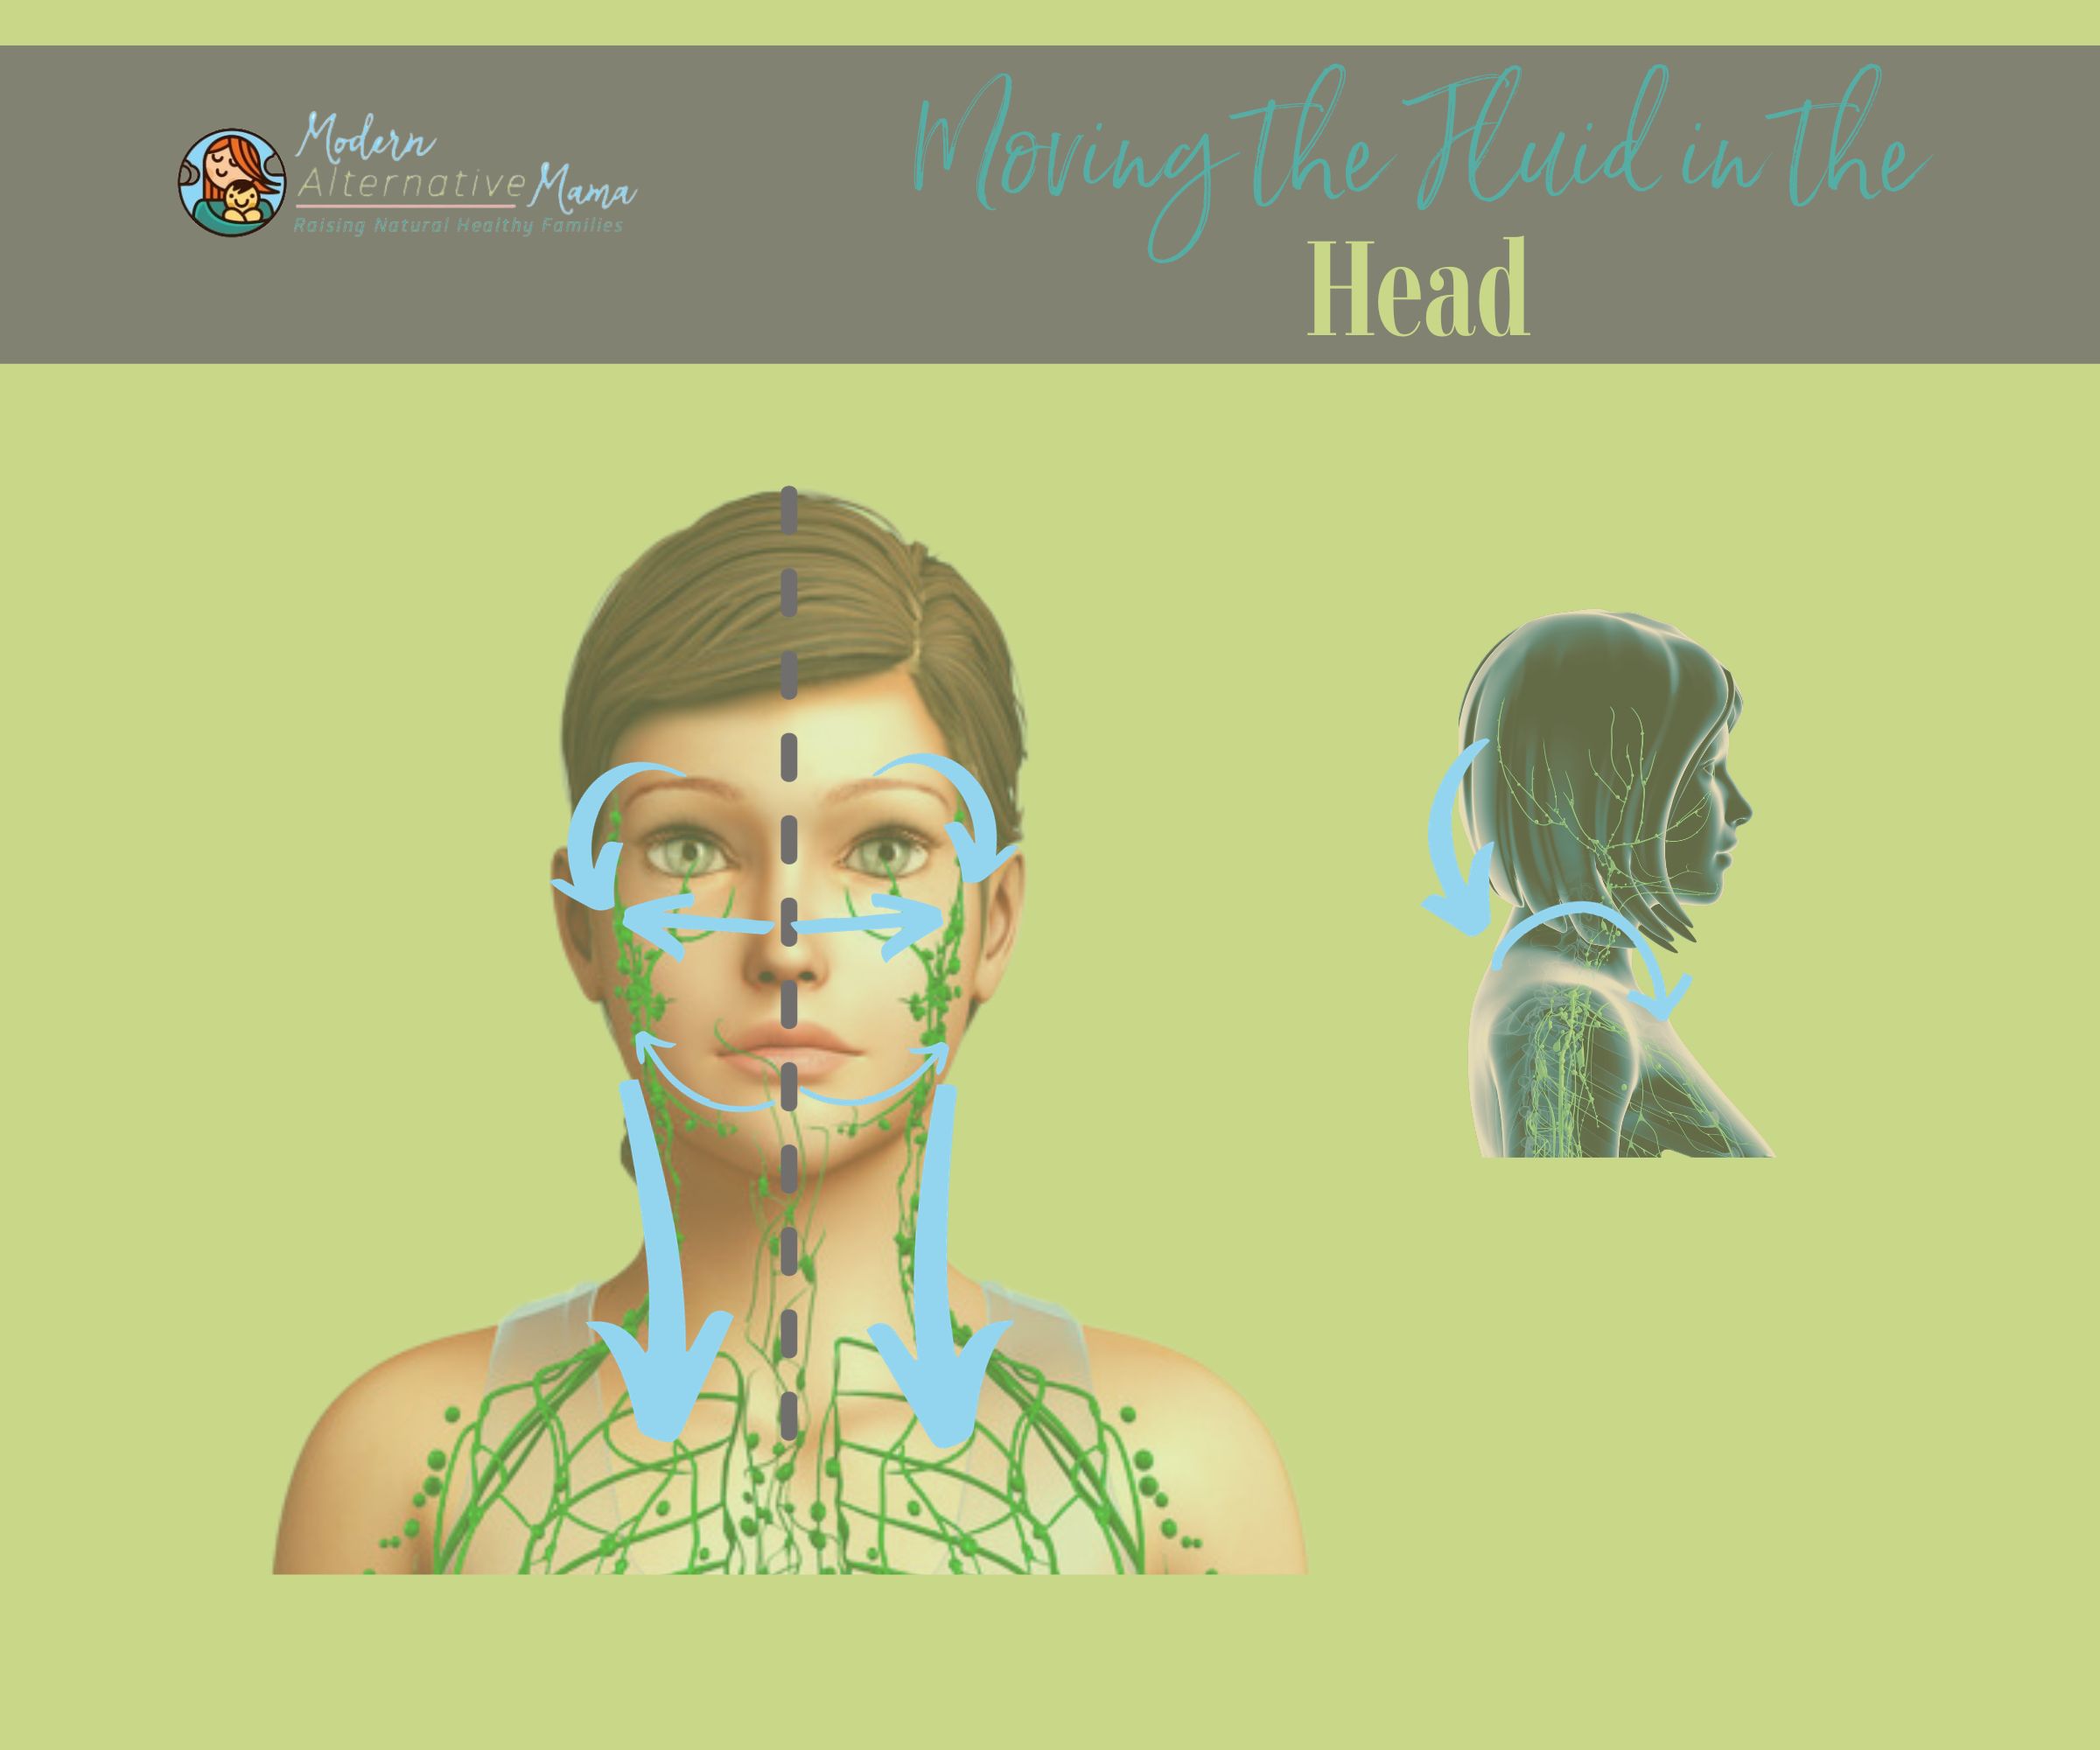
- Imagine a line down the center of your face. Starting at the top of the line using both hands, gently rub from the middle of your face towards your ears. Go from the forehead down to the chin.
- Place your two fingers on each side of your lower earlobes down to the squishy spot below your collarbone where you can gently tap a few times.
- If you have jaw pain, press firmly but gently into the top jawline up into the corners towards your earlobes while lowering your bottom jaw.
- Gently rub down the back of your neck and around each side to below your collarbone. If you have a pronounced bump at the base of your neck, press firmly but gently, bringing the fluid around to the front.
- Here is a video showing a head drainage self-massage by a massage therapist: Learn to drain your head and Brow Drainage
Arms
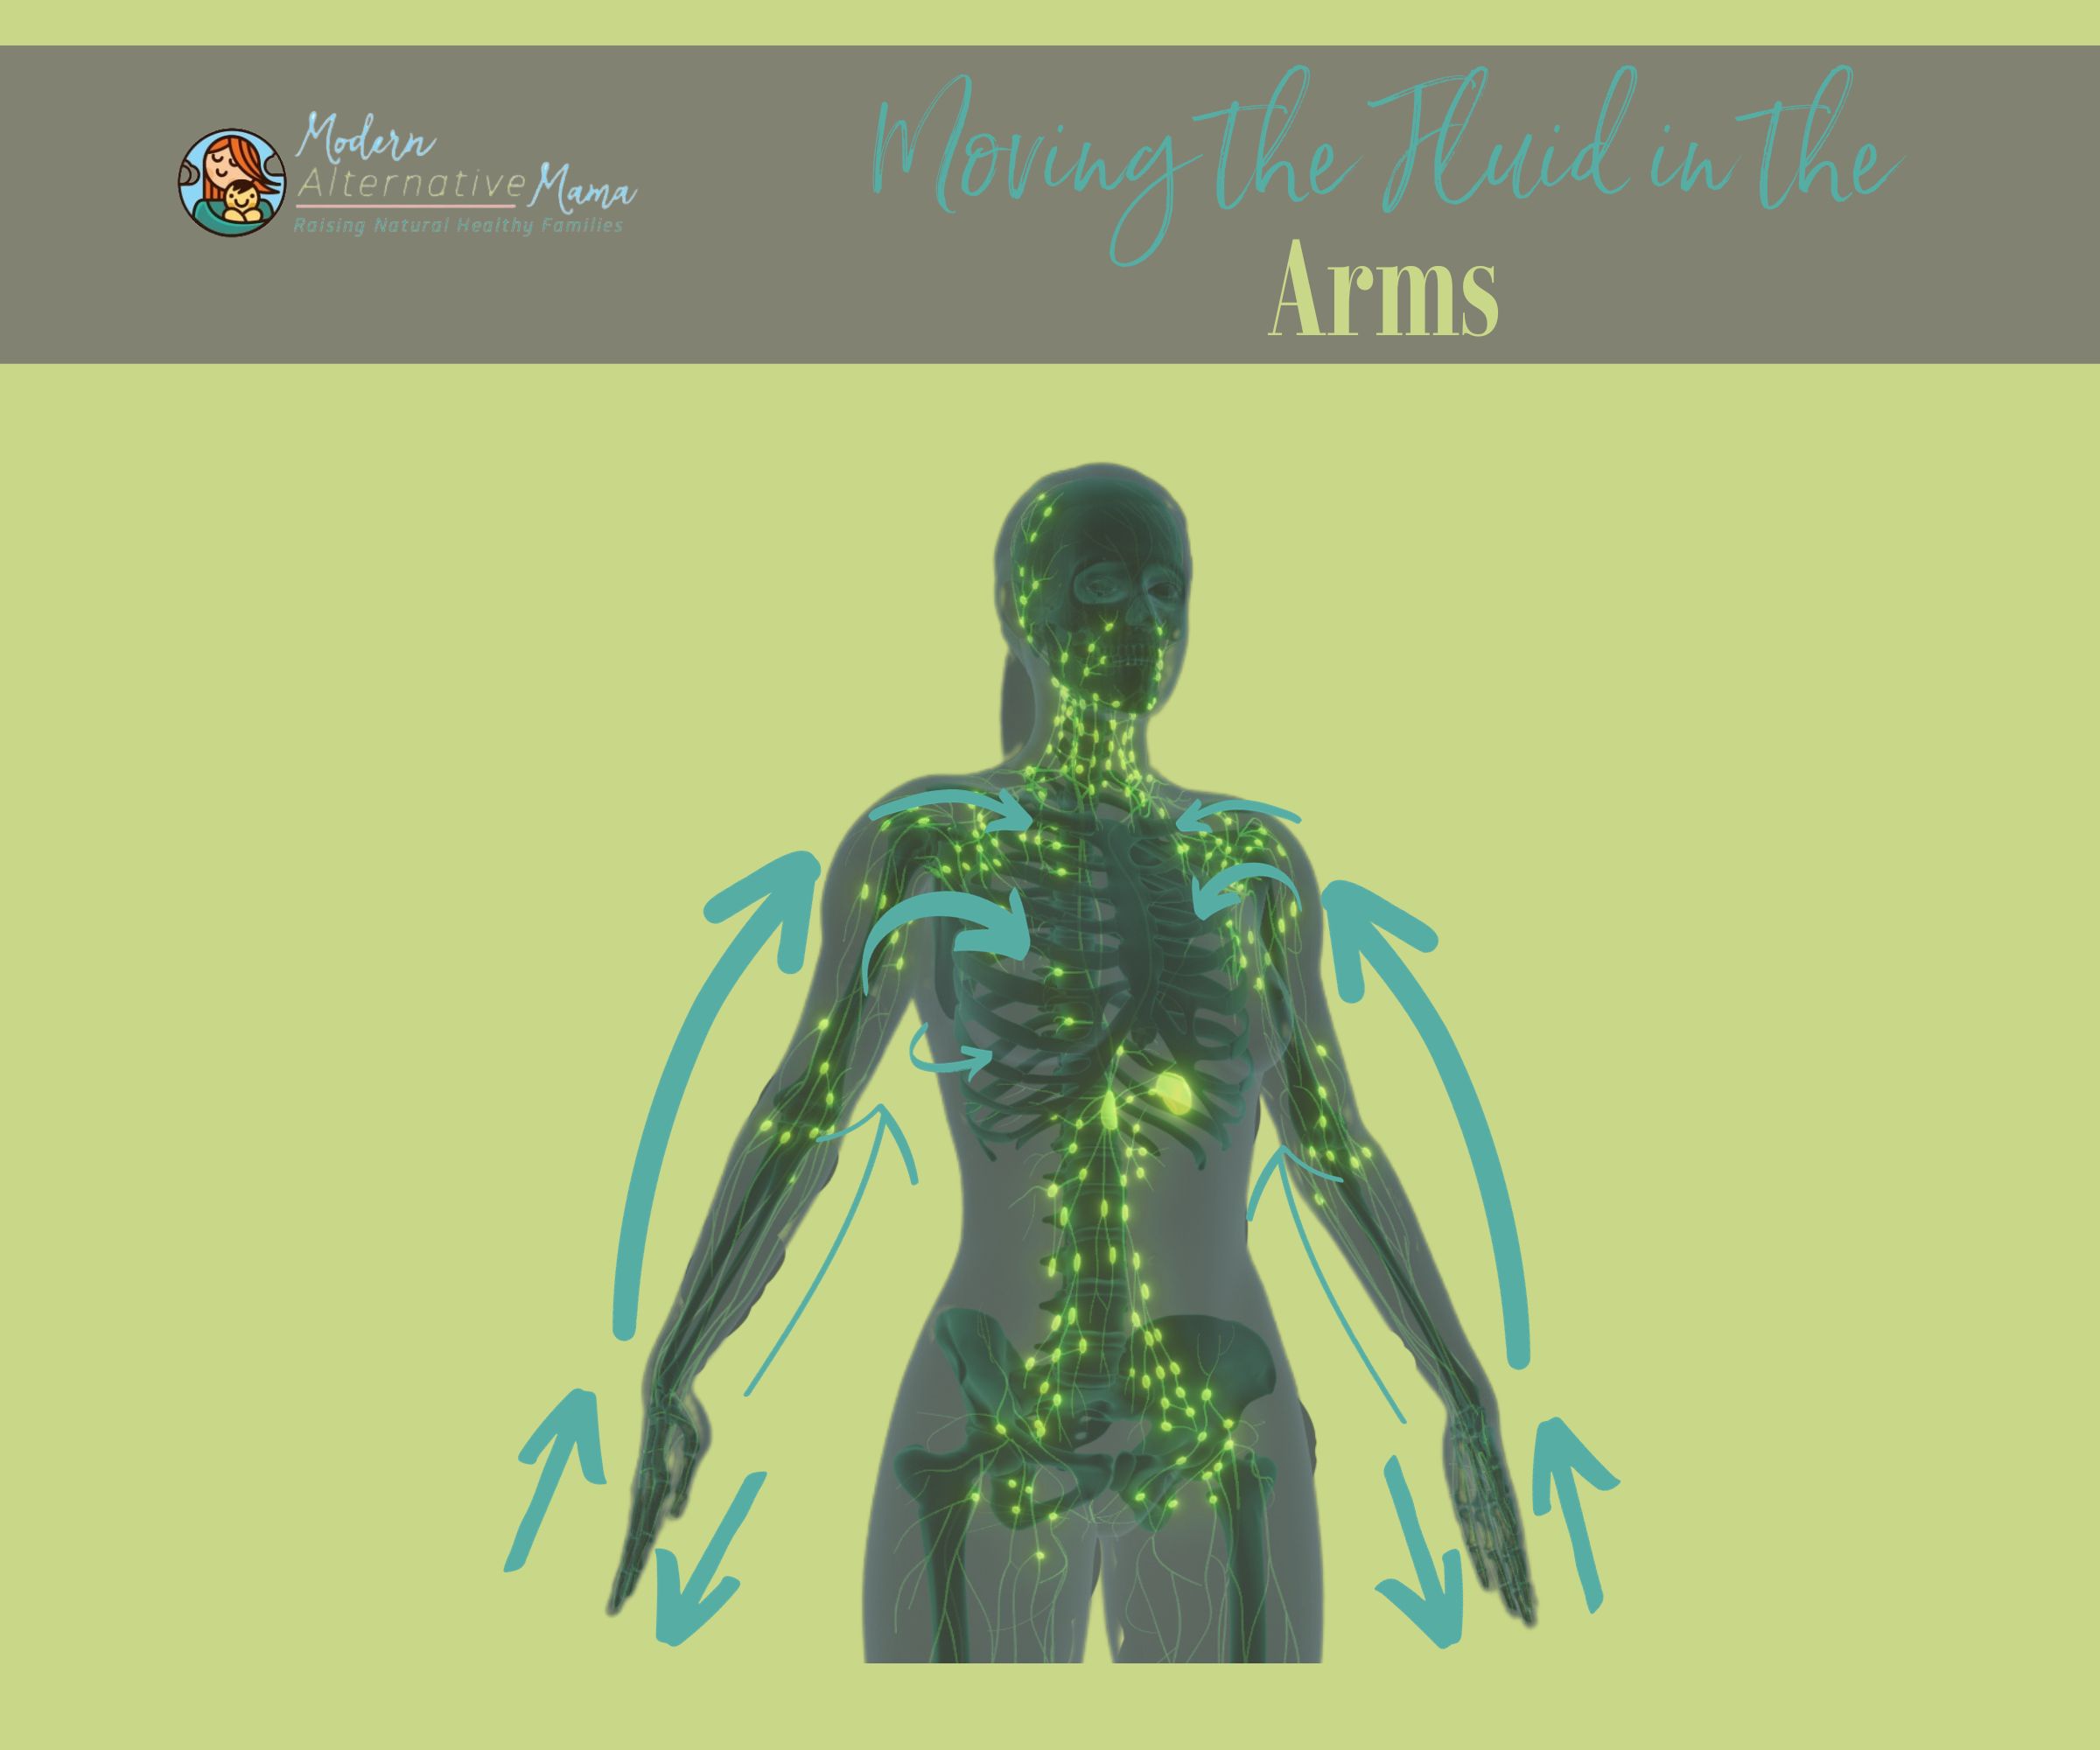
- Rub the palms of your hands together then go up the palm side of your fingers and down the back side of your fingers (the lymph vessels are on the back side of your hands).
- Follow from the back side of your hand down following a natural curve to the inside of your elbow to the top, underside of your arm going down below the side of your chest.
- Video of Upper Body and Arms
Abdomen and Back
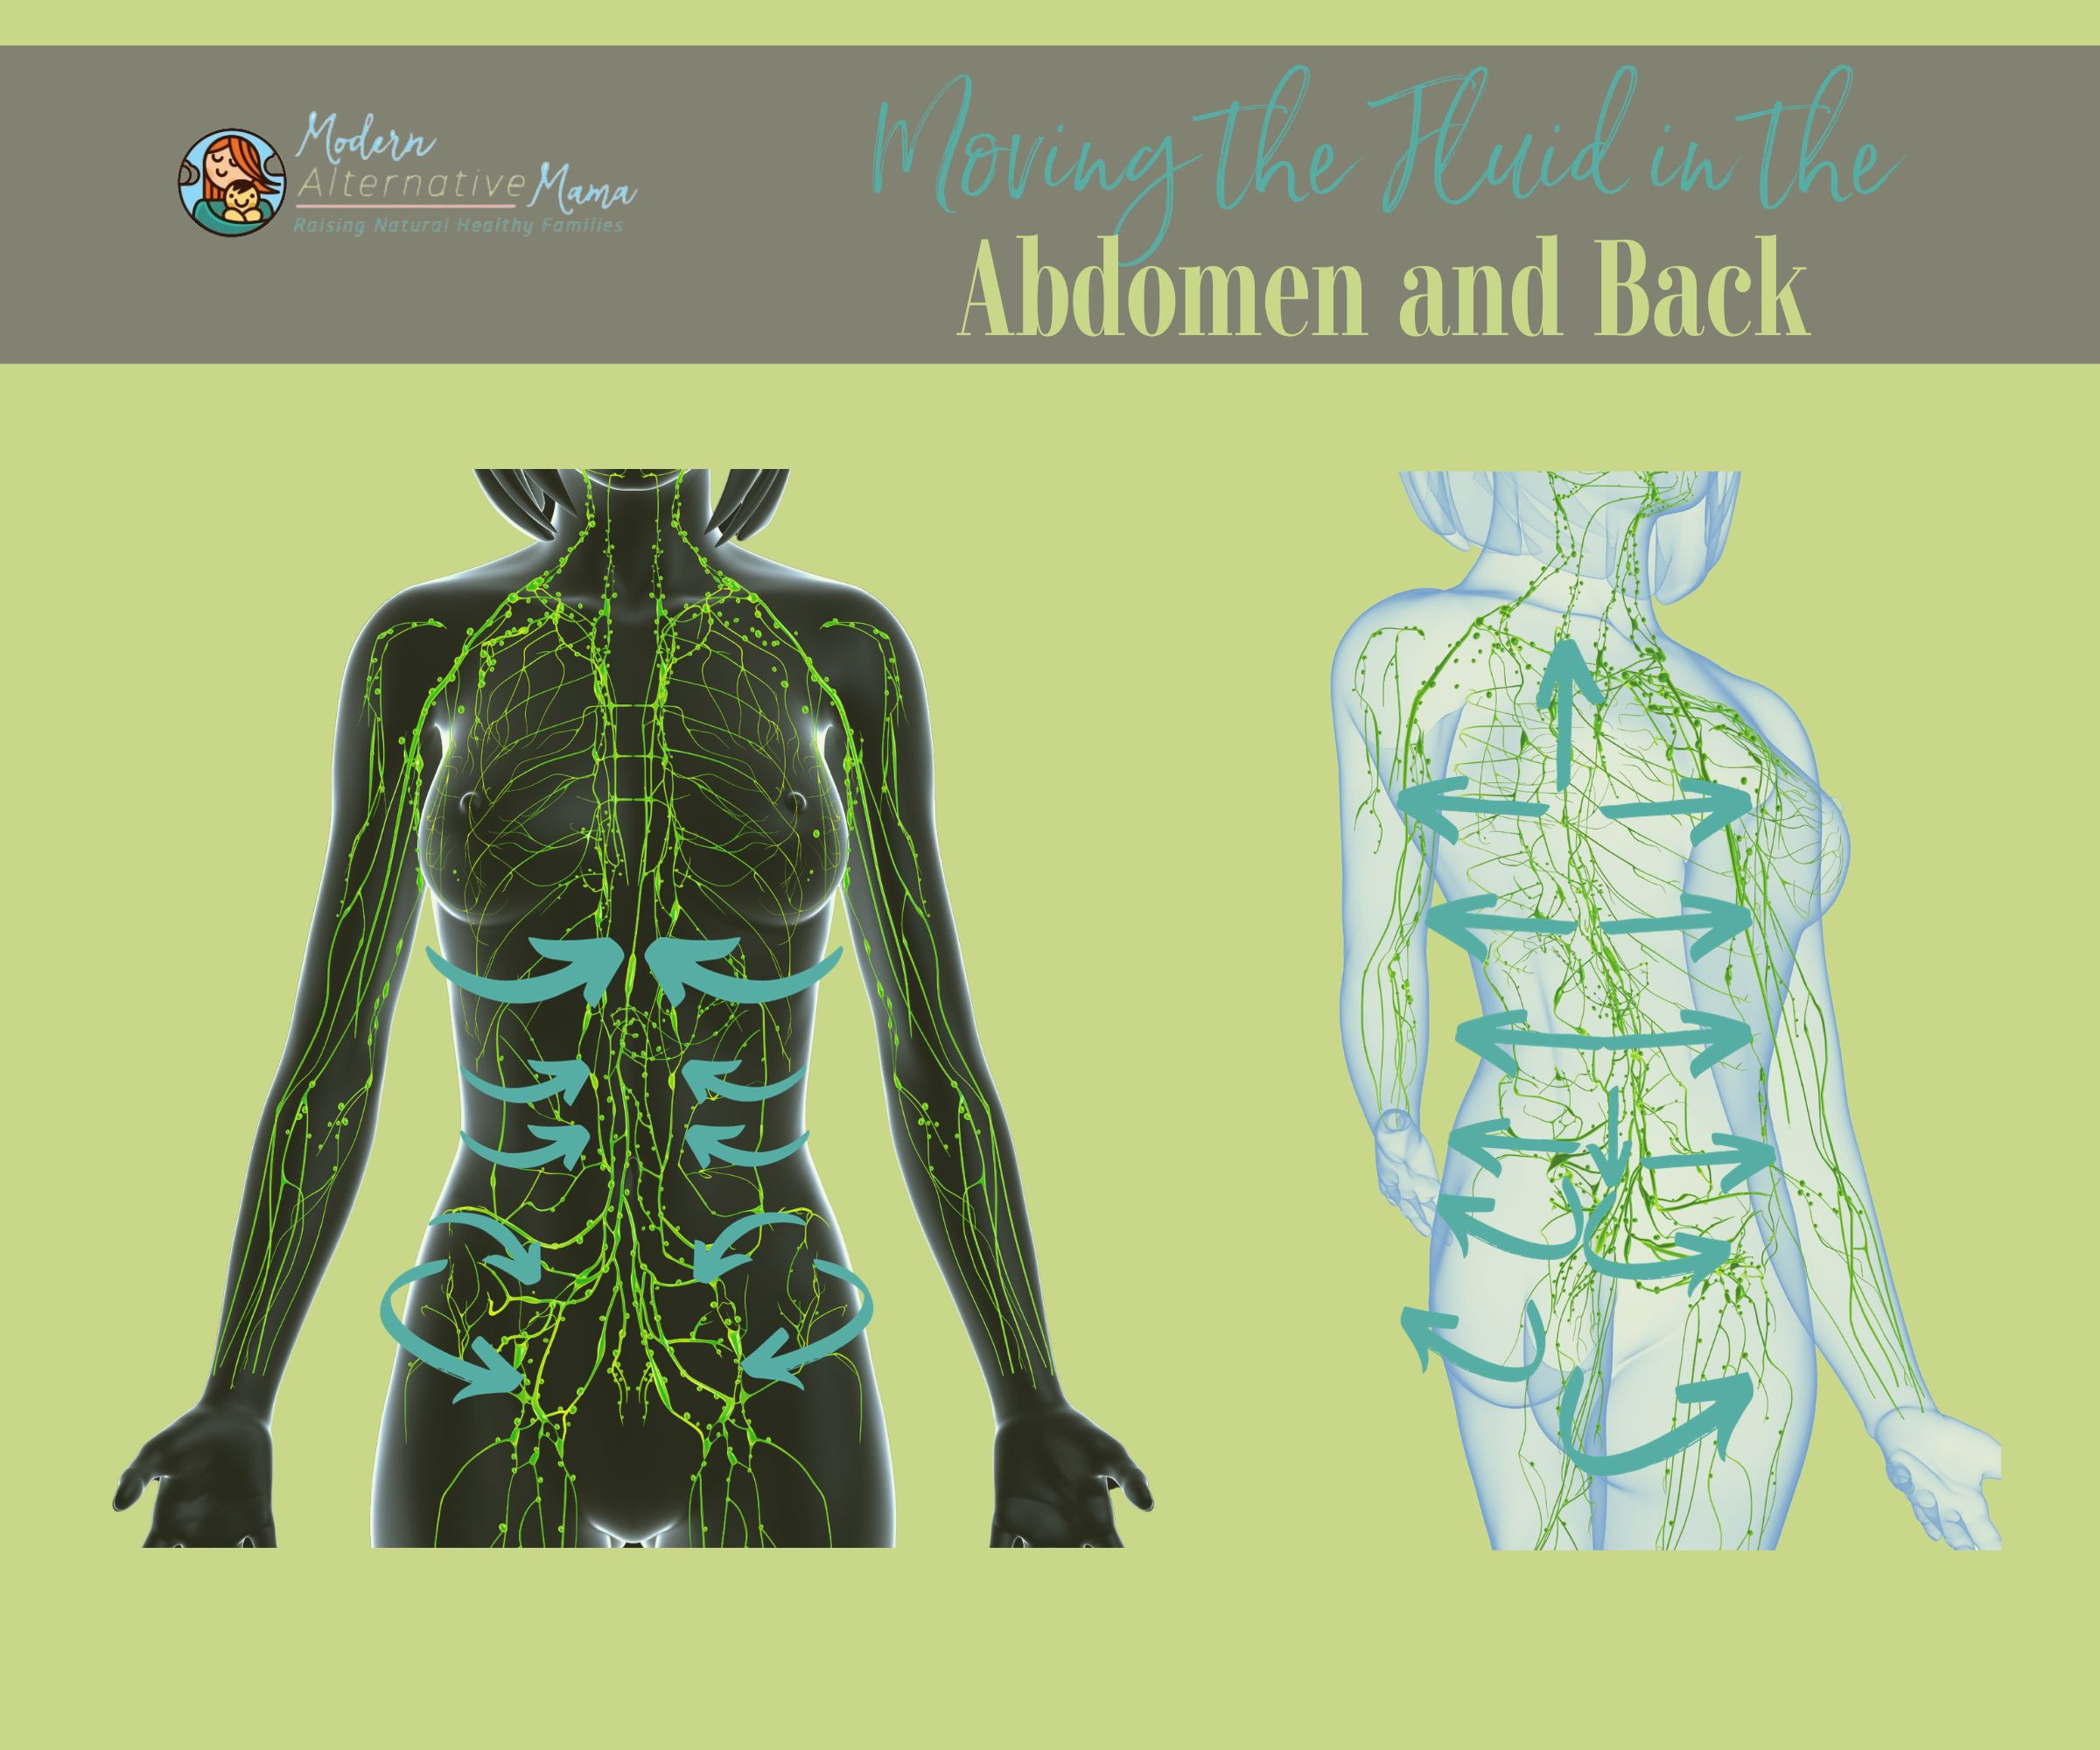
- Reaching as comfortably as you can from the middle of your back – while still being gentle, rub around to the front.
- The upper part of your abdomen drains to the thoracic area, and the lower abs drain down to the lower end of the spine in the sacral region.
- Here are some abdomen and back lymphatic massages. It comes in 2 parts (upper and lower abdomen).
Legs and Sacral Region
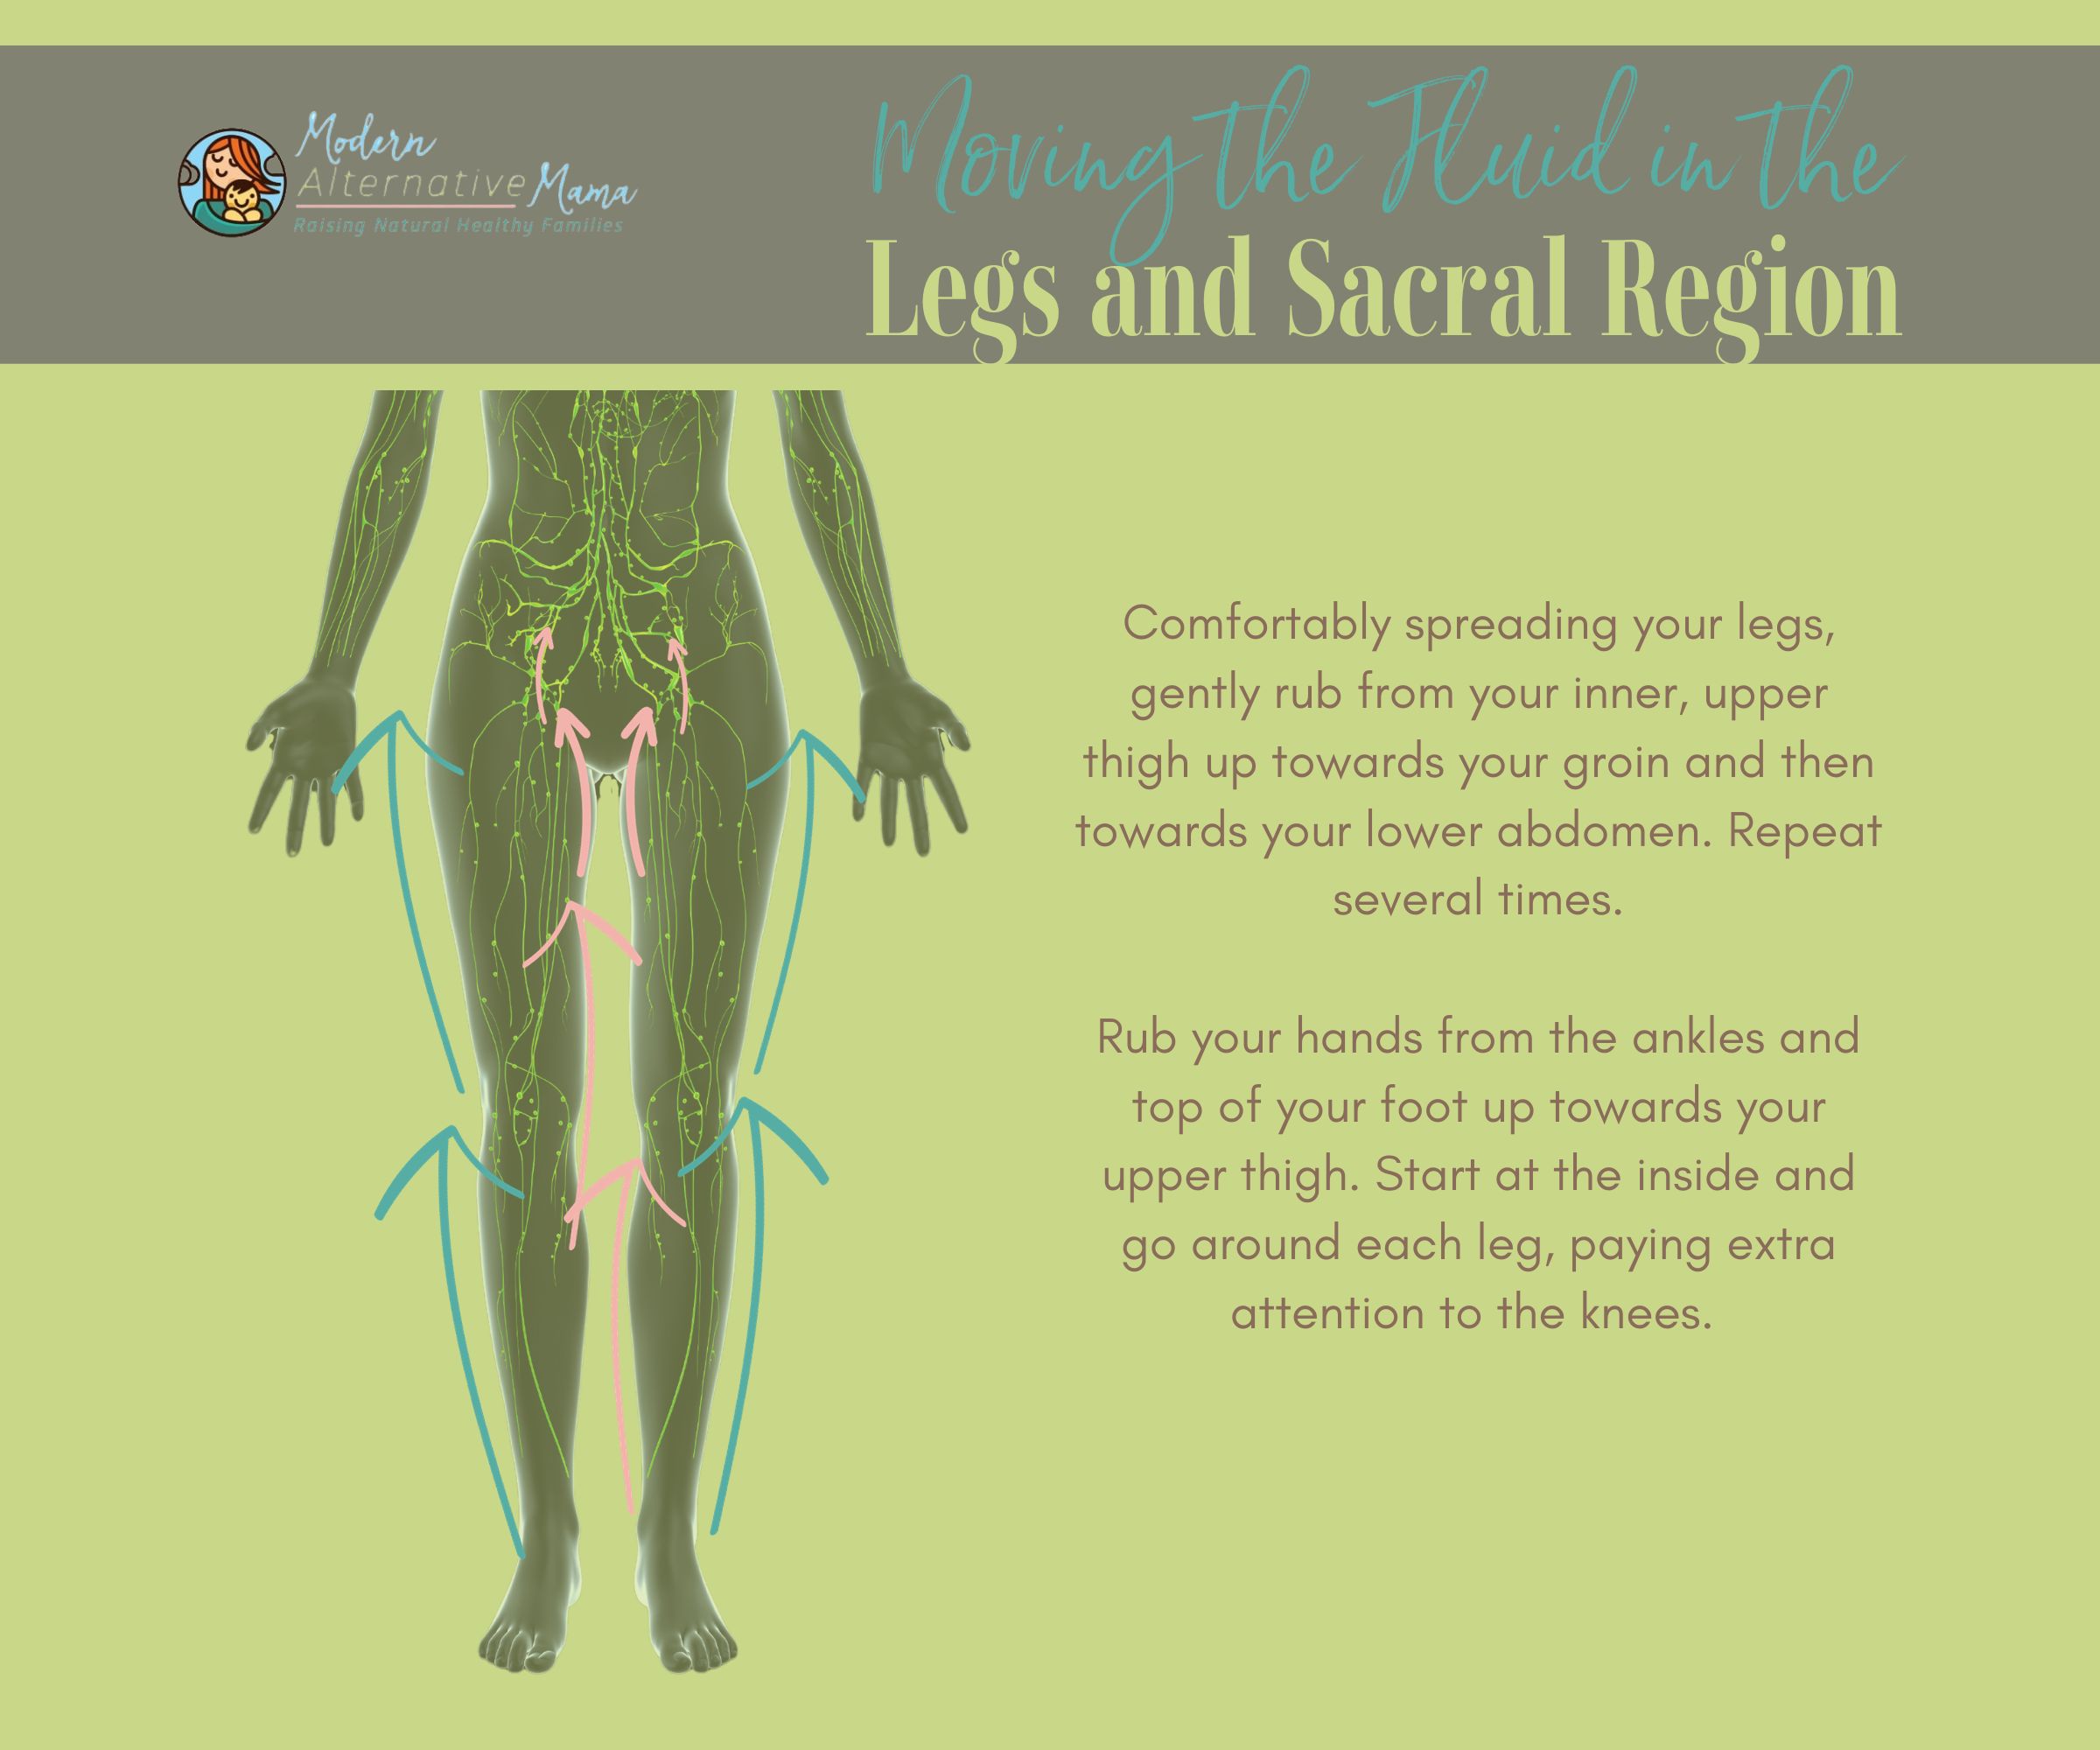
Next is the lower half of the body. We want to open the flow in this area just like we did around the neck and arms.
- Comfortably spreading your legs, gently rub from your inner, upper thigh up towards your groin and then towards your lower abdomen. Repeat several times.
- Rub your hands from the ankles and top of your foot up towards your upper thigh. I like to start at the inside and go around each leg, paying extra attention to the knees.
- Videos:
DIY Body scrub to support lymphatic drainage
To keep the lymphatic system moving, especially when your body feels sluggish and sore, try this body scrub.
Ingredients to just mix together:
- 1 cup Pink Himalayan sea salt
- 1/2 cup avocado body oil
- 1/2 tsp of lemon or orange peel zest
- 20 drops of grapefruit essential oil
To use: Massage it in and let it “soak in” for 5-10 minutes before showering it off.
Also, try this DIY: Lymphatic Support Tincture for more support!

Would love to be able to save this on Pinterest or another way.
Hmmm. We thought we had this setting straightened out so it would work. We will keep trying! Thank you 🙂 You can add the pin to save by using the website link and the image inside the blog (usually a taller, narrow pic for pinterest size).