Written by Kate Tietje
This summer, keeping a first aid pouch with me is important. I want to ensure I have all my bandages, antibacterial cut salves, essential oil rollers, and more to deal with any little cuts, scrapes, and bumps on the go. You just never know, with lots of outdoor play and bugs that bite and sting.
I’ve never had a great solution for carrying all of my items before. I’ve looked online several times for cases I can buy but have never found one that really worked for me. I decided, finally, that it was time to sew one myself.
After all, even if I found a first aid pouch online, it likely would be designed to carry just one type of item- essential oils, bandages, etc. Or it would be an open bag with no pockets. I’m really not going to find what I want anywhere. So! Time to sew.
This first aid pouch must be very sturdy because it will hold a lot, and some will be glass. It zips closed on top and has some special pockets and “holders” to keep all the small stuff in one place. Let’s jump in!
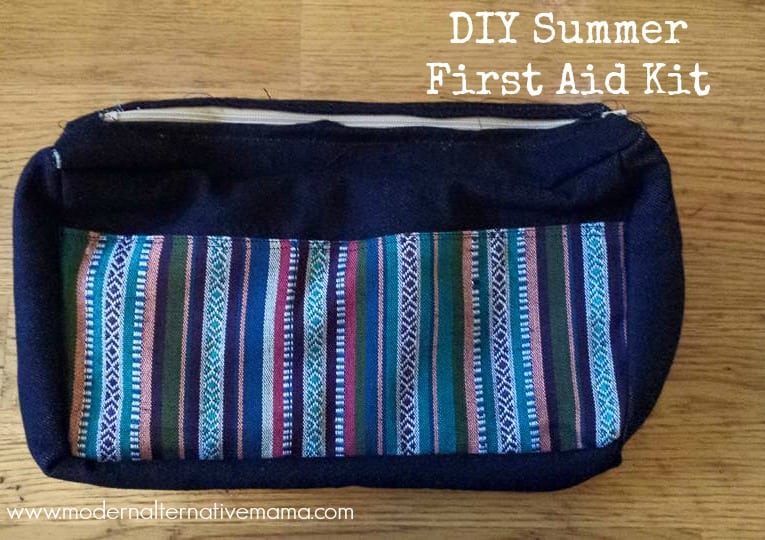
Fabric First Aid Pouch
You will need:
- 1/2 yard of very heavy bottom-weight fabric (I’m using heavy denim; canvas would also work)
- 1/4 yard contrasting bottom-weight fabric
- 7″ zipper
- Thread
I chose dark blue denim and a dark multi-colored striped fabric for my colors.
Directions:
Step 1: Cut two 10″ x 6″ rectangles out of denim. (These are your front/back pieces)
Step 2: Cut a 16″ x 4.5″ rectangle out of denim. (This is to create a series of small “pockets” for tincture bottles or EO rollers.)
Step 3: Cut a 10″ x 4″ rectangle out of denim. (This is for a single long pocket inside)
Step 4: Cut 2 rectangles that are 10″ x 3″ out of contrasting fabric. (This is for your decorated sides.)
Step 5: Cut a long strip that is 22″ x 2.5″ out of denim. (This is for the pouch’s bottom and sides.)
Step 6: Cut a 10″ x 2.5″ strip out of denim. (This is for the pouch’s top/zipper.)
Step 7: First, take the two rectangles of contrasting fabric. Hem one of the long sides, folding down 1/4″.
Step 8: Pin the contrasting fabric to the two 10 x 6 rectangles and sew them on. (You can skip this, but it’s prettier and helps me to tell the difference between this and my wipes case.)
Step 9: Take the 16 x 5 rectangle and hem one of the long sides, folding down 1/4″.
Step 10: Pin the 16 x 5 rectangle to one of the 10 x 6 rectangles, matching the edges (wrong sides together). What we’re going to do here is to create small “pockets” for essential oil rollers or small tincture bottles. I’m pinning mine for about 3 rollers and 2 tincture bottles.
Step 11: Sew the sides of this together. Then, where you placed your pins, sew a straight line down. This creates small “loops” of fabric that will hold these items.
Step 12: Sew the bottom of this section closed, gathering the fabric as needed so it all lines up.
Step 13: Hem the 10 x 4 rectangle along a long side, folding down 1/4″.
Step 14: Sew the 10 x 4 rectangle to the other 10 x 6 rectangle (wrong sides together). This creates an internal pocket.
Step 15: Pin one of the sides to the long 22 x 2.5 strip, right sides together.
Step 16: Sew around the bag, curving slightly around the corners.
Step 17: Repeat steps 15 and 16 with the other side of the bag. Keep it inside out.
Step 18: Cut a slit down the middle of the remaining 10 x 2.5 rectangle. Open the slit by 1/4″ at each end.
Step 19: Fold out the slit, and pin the zipper to it.
Step 20: Sew along the zipper on both sides and across the bottom and top.
Step 21: Open the zipper slightly. Pin the zipper piece to the top of the bag.
Step 22: Sew around the top of the bag.
Step 23: Open the zipper completely and turn the bag right side out. Your bag is finished!

[…] I shared with you how to make your own first aid pouch. I’ve been wanting a nice pouch like this for years but finding one to buy was literally […]
Can I purchase one of these from you?!? I have..ZERO.. sewing talent! 😛
Awe! Sorry, we don’t sell them but you might be able to do it if you try! Sending positive sewing vibes your way 🙂
Is there a possibility that the fabric measurements are wrong? My 10×3 contrast for the beginning looks a lot smaller than your pics… I’m confused.