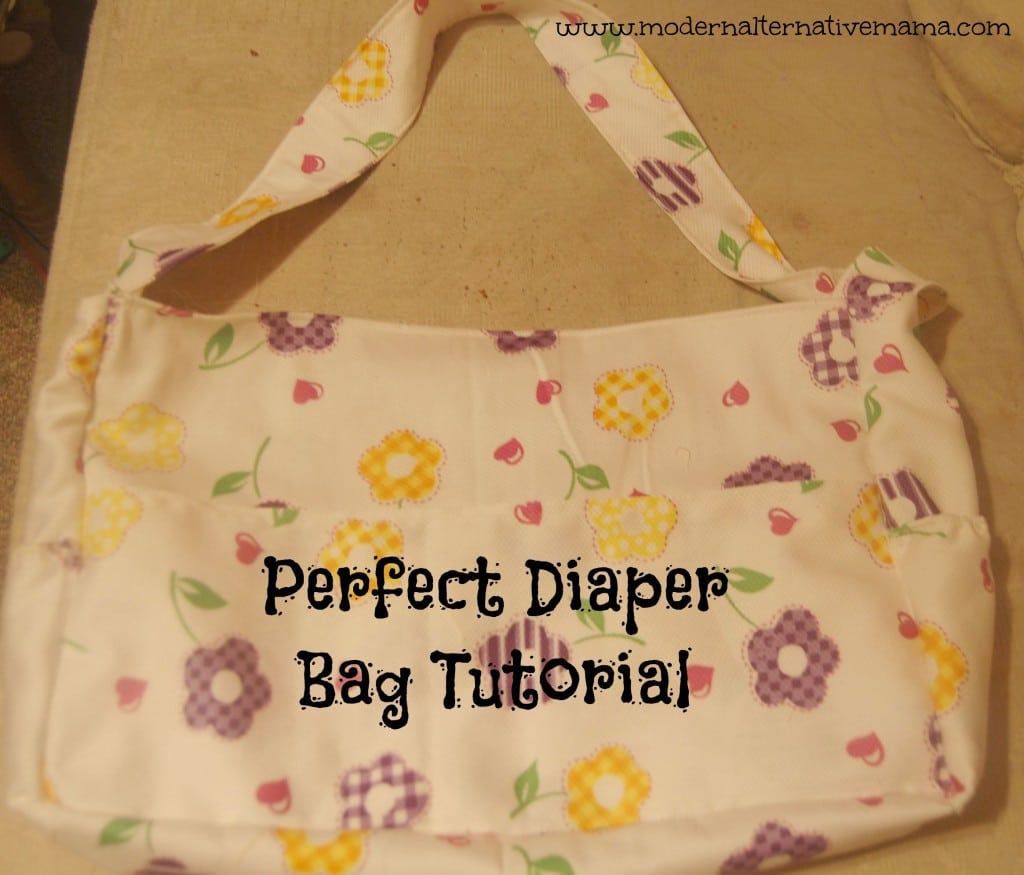
Written by Kate TietjeIt’s a necessity for mommies everywhere. Raising six children, of course, I’ve looked at tons online (which can cost up to several hundred dollars if you want a designer label — I fail to understand why that would ever be necessary, but that’s me). I’ve used a few I was given or bags I had around. I sewed one right before I had my second baby (it was okay — too big, and the zipper broke, and I never fixed it). I’ve given it a lot of thought, really — what would be in my ultimate diaper bag?
Well, here were my issues:
- Space — I needed something that would carry everything I needed for all my kids but not overwhelmingly big.
- Pockets — I had many things to carry, like keys, wallet, snacks, wipes, etc. I liked to have separate pockets to put them in so I could easily find each thing.
- Wet bag — I never.remembered.to.bring.it. EVER. I usually ended up tucking my dirty diapers in a side pocket, which meant the whole bag smelled and had to be washed frequently.
- Cups — The kids constantly wanted a drink on the go, so we took cups everywhere. There had to be an easily-accessible place to put their cups.
- 12″x 18″x 6″ size
- Zip closed on top
- Long 2″ wide shoulder strap
- Three divided pockets on the outside
- Cup/bottle holders on both ends of the bag
- Inside, a large snap-closed pocket
- Other inside, built-in wet bag with zipper
- Zippered snap-on pouch (inside) for wallet, keys, and phone (option)
- Fully lined
How awesome does that sound?

Diaper Bag Tutorial
Now, there are some tricky parts to this. Putting in that wet bag is a bit frustrating at times. But go slow; take it step by step, and you will get it done. Are you ready?
Materials:
- 1 yard “cute” bottom-weight fabric
- 1 yard lighter fabric (for lining; I used linen)
- 1/2 yard PUL
- 10″ 1/4″ elastic
- Matching thread
- 18″ zipper
- 14″ zipper
- 5 snaps (if desired)
Now, you will need to cut several pieces from this. I will attempt to show you below in a picture, but I will also tell you.
- 4- 13 x 19 rectangles (2 cute fabrics; 2 lining fabrics) — this is the body of the bag
- 2- 45 x 7 rectangle (1 cute; 1 lining) — this is the sides and bottom of the bag
- 2- 24 x 3 rectangle (cute fabric) — this is the strap
- 2- 6 x 7 rectangles (cute fabric) — these are the cup holders
- 2- 19 x 7 rectangles (1 cute; 1 lining fabric) — this is the inside pocket and outside pocket
- 1- 19 x 24 rectangle (PUL) — this is the wet bag
- 1- 8 x 4 rectangle (cute) — this is the optional snap-in pouch
Directions:

Breathe. One step at a time. I can’t tell you how many times I went over and over all the pieces I cut to ensure I had all of them. If you’re missing something, you can always go back later. The pieces above are folded up in some cases so you can see the lining pieces underneath. The top is the strap; the large center part is the body pieces; the left side is cup holders; the right side is inner/outer pockets; the bottom is the bottom/side of the bag. PUL is missing from this picture (oops).
Step 1: First, we’re going to do the strap. It’s the easiest. Put the fabric pieces right sides together, and sew around both the long and short sides, leaving the other short sides open.

Step 2: Use that open end to turn the fabric right side out. It will look like a tube.

Step 3: Tuck the ends of the open side in about 1/2″ and sew it closed. Then, turn to the long side, press it down smoothly, and sew all the way down. Go around the entire strap this way. This is called “topstitching,” and it makes your tube into a nice flat strap.

Step 4: There, the strap is done. Now, let’s do the side/bottom. Measure from each end of this piece (the cute one) down exactly 13″. Make a mark here.

Step 5: This is where you will put the bottom of your cup holders. Set it aside for a minute. Pick up each cup holder and get your elastic. Cut it into two 5″ pieces. Now, place the elastic on the wrong side of each cup holder, about 1/2″ from the top.

Step 6: Use a zigzag stitch to sew the end of each elastic to the edge of the cloth (positioned as above). Then, slowly stretch it and sew it all the way across. When it’s done, it will naturally pucker since you stretched it.

Step 7: Fold down the extra fabric over the elastic. Sew it down, stretching the elastic so you get a smooth, straight seam as you do. Do the same to the second cup holder.
Step 8: Now, it’s time to sew the cup holders onto the long bottom/sides of the bag piece. Place the bottom of the cup holder at the mark you made earlier (it will not go all the way up) and sew it down.

Step 9: Notice, because of the gathering, that the top edges match, but the bottom is a little bigger than the strap. Simply gather it in the center (I did two little “fold over” sections about a third of the way through), and then it will match nicely, and you’ll have a good pocket.

Step 10: You can see some of the gathering in the above picture. Do the same thing to the other cup holder.
Step 11: Pin the lining fabric to the back of this one (wrong sides together). Sew the long sides, but leave the short sides open for later. Set this aside.
Step 12: Now, we’re going to work on one of the sides of the bag. You’ll need one “cute” side, one lining side, and both the cute and lining pockets.
Step 13: First, hem the top edge of the big pockets.

Step 14: Pin the inner pocket to the lining and the outer pocket to the outer fabric.


Step 15: Sew these down along the sides and the bottom, leaving the top (hemmed part) open.
Step 16: Now, put the two parts together (pockets facing out) and sew them together. This part of the bag is now done.
Here comes the trickiest part…so pay attention! This wasn’t as hard as I thought it would be.
Step 17: Get your other lining fabric and your PUL. Lay the PUL out flat with the shiny side DOWN. Place the lining fabric over the top half of it, and pin it down (seriously — pin it. I didn’t, then screwed it up, had to rip stitches, and pin it to redo it).

Step 18: This is tricky to sew because the shiny side of the PUL is down against the sewing machine, and it slips around easily. Go slow. Sew it together on all four sides. On the bottom (where the PUL hangs down), stay a couple of inches above the bottom of the lining fabric. Later, you will be folding the PUL up to make the bag.
Once these parts are sewn together, it’s time to make the slit for the zipper. Here is about where it should be placed.

Step 19: You need to cut a slit in the fabric where the zipper lies. This slit will go through both layers — the PUL and the lining fabric. It should be slightly shorter than the zipper itself.

Step 20: On the edge of each slit, cut up about 1/4″ and down about 1/4″. Fold these over (both layers) with the PUL side facing up. Pin the zipper to the PUL side. You are pinning it to the lining (folded over), PUL (folded over), and both layers in the front.

Step 21: Sew the zipper on both sides (along where it is pinned). The zipper will be sewn into four layers of fabric.

Then the zipper is in!

Step 22: Now, flip it over and fold up the PUL. Sew it on all the open sides so it is now a closed bag, accessed through the zipper.

Step 23: The final step to this side is to pin the outer fabric to the wet bag and sew it together on all four sides.

Now, it’s time to put the whole thing together! Almost done. 🙂
Step 24: Pin one side to the long side/bottom piece you sewed earlier. The corners will be a little bit weird; it’s okay. Later, you’ll fold them over slightly as you sew. Pin RIGHT SIDES together now; you’re finishing it with neat edges!
(You can see a snap I put on in the picture below. It didn’t work out well, mostly because I can’t find the second die for my snap press. But you can add one to the lining fabric, or Velcro, before sewing the lining to the cute fabric when you sew the side with pockets way before.)

Sorry, that is blurry. Somehow, I only took one shot.
Step 25: Fold over the corner carefully as you sew, just slightly so it all fits.
The last step is the strap (and zipper, except I ran out of time and didn’t get to mine — I’ll mention it briefly in a minute, but I don’t have pictures).
Step 26: Tuck the unfinished edges of your sides in and put the strap down between them. Sew across to finish them and sew the strap on.

Step 27: To do a zipper, you will simply pin it to the inside of each edge of the bag and sew it like the previous one.
Then, your bag is done! How awesome is that? The diaper bag tutorial wasn’t that hard, was it?
What’s your favorite diaper bag feature?


I want a diaper bag that also functions as my purse, so I don’t have to carry both! I found one I really like on Amazon for $16! The zipper on one of the pockets broke after the first year of use but otherwise it still works great. Lots of pockets but not too big. I do cloth diaper at home but use disposables when we are out and about. I have two kids (ages 4 and 20 months) and a third on the way. I still plan to use this bag, although I should fix the zipper before baby comes!
I love the built in wet bag!!! I don’t have a sewing machine right now, so I’m hoping my sister will make this for me (I sent her the link!).
[…] Diaper Bag […]
[…] The Perfect Diaper Bag Tutorial […]
I would like to see a video of this, pictures don’t do a thing for me.
[…] Diaper bag […]
[…] not too big, not too small, has a stiff bottom, lots of pockets, and more. It sort of follows this pattern, but I added extra cup holders along one of the long sides and I skipped the wet bag (but used […]