Written by Debra
I have a confession. I love using cash instead of cards for our budget... but I have really struggled with being on top of it. We would have cash envelopes in our desks, and I’d try to draw money from there when I needed it, but it was NOT WORKING!
We would have cash with us, but it might be cash from the ‘groceries,’ then I had to get something under ‘clothing.’ I’d make a mental note and rearrange the money when I returned home. It’s not exactly an ideal way of keeping a cash budget. So, as much as I love the idea behind it, I have not been so hot on doing it. It was just too complicated.
I needed an envelope system. Something I did not even KNOW about a few months ago, but thanks to a post on Stacy Makes Cents, I now do.
To effectively use a cash budget, you need to have a system of organizing the cash in your budget. That is where the envelope system comes in handy. It’s a collection of envelopes to hold different categories of money. There are a lot of different kinds out there.
Store-bought ones that started at $20 were kind of ugly. Then a plethora of Etsy ones that were cute, but not what I needed and were even MORE out of our price range. There were also tutorials, but none really gave me what I needed.
Most of them do not have a good way to store the envelopes. I do not want to have to wrestle with a bunch of envelopes while at the grocery store. I am trying to use an envelope system to make it EASIER for me to keep to a cash budget, not HARDER. So, I began dreaming up a cash system that would meet my needs- not cost over $20, easy to use, and, if possible, look cute. I found it, and today I’m sharing it with you.
Why I Love This System
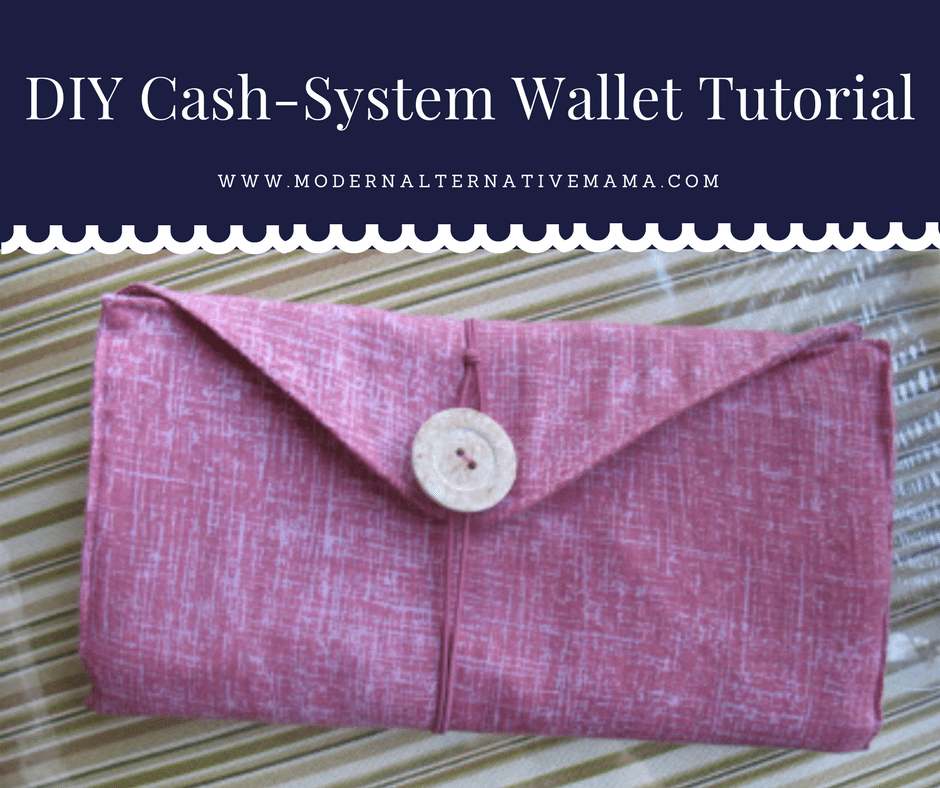
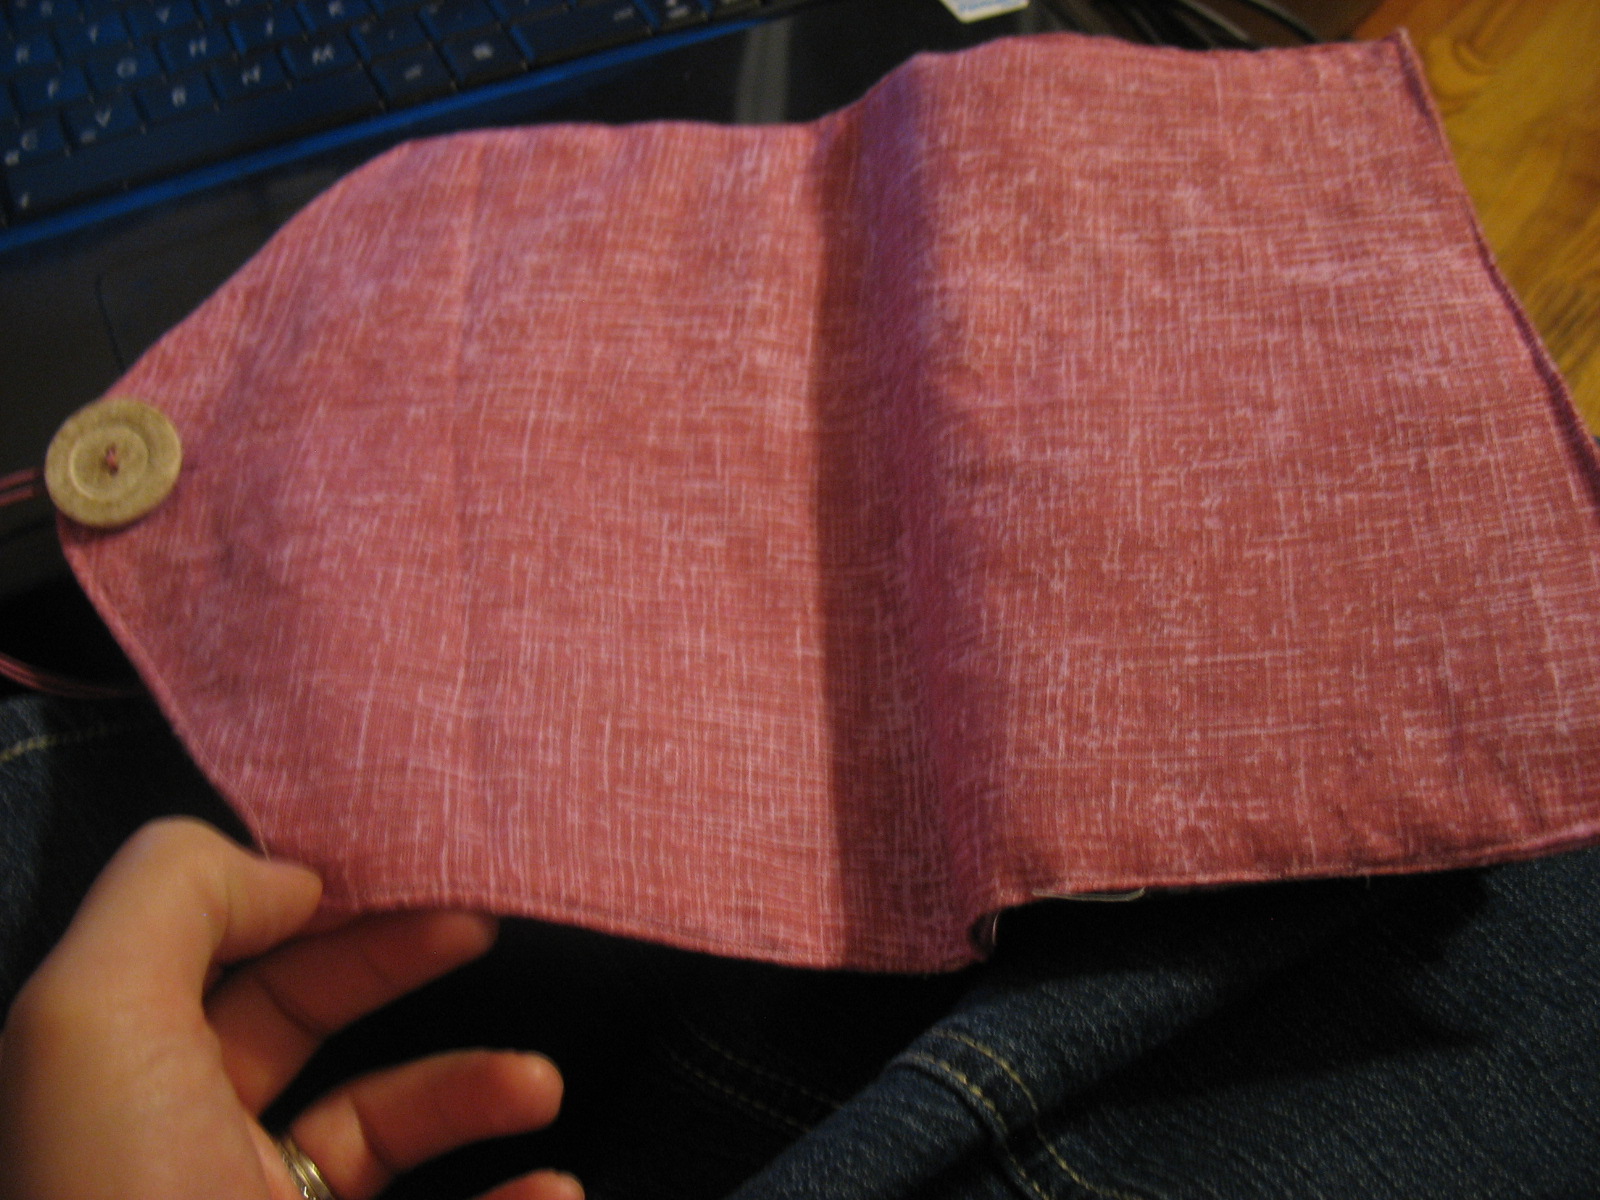
This envelope system is “wallet style,” meaning all the envelopes are inside a wallet. I guess I did not need to explain that. I can just open up the wallet, and I am greeted with a series of envelopes that are quite accessible.

There is also a coin envelope, which excites me probably a lot more than it should! I like being able to make exact changes, but I do not want a bunch of coins running around in my other envelopes.
It is also custom-made AND REALLY CUTE! But I’m partial; I made it.
How to make your very own Wallet Style (super duper cute!) Envelope System
Let me begin by saying there are quite a few steps, but it is simple! I think this could be made in 1-2 hours. It took me a while, but I made the pattern and took LOTS AND LOTS of pictures for you. Most of the steps are the little things that just help keep it nice and neat. If you are an amazing seamstress, please do not be bothered by the instructions for even super simple things. I hate reading tutorials that assume I know TONS of information.
What you need:
- Enough fabric to make two 8.5″ squares for EACH envelope you would like. I did enough for 7 and spent WAY too long picking out those fabrics from my stash. But aren’t they cute?

- You will also need fabric for the outside, enough to make two 15″ by 9″ rectangles.
- A thick fabric, such as upcycled denim from a really old and ugly pair of jeans. You will need enough to make a 15″ by 9″rectangle. You could probably also use heavy-duty interfacing, but I made a New Year’s resolution not to buy new stuff for crafts, so I had to use what I (or my sister, Thanks, Amy!) had on hand.
- One cute, rather large button
- 8″ of Velcro (if you want a coin pocket)
- 20″ of elastic string (like this)
Cutting and Sewing the (to-be) Envelopes
What you are making is an 8″ two-sided square. Super simple.
Step 1: Iron all the fabrics you will use to make the envelopes. This is especially important for a project like this because everything is straight and clean-cut.
Step 2: Cut out an 8 1/2″ piece of paper or paper bag.
Step 3: Use that template to cut out two squares from each fabric you make into envelopes.
Step 4: Sew the right sides together using a 1/4″ seam allowance, and leave a two-inch or so part open to turn them out again.
Step 5: Repeat with each (to-be) envelope.
Step 6: Trim the squares’ corners, ensuring not to cut the seam.

Step 7: Turn all the envelopes right side out.
Step 8: To make the corners nice and sharp, poke them out with a chopstick or pencil.
Step 9: Turn the turning hole in by 1/4″ and iron down.

Step 10: Neatly iron each envelope in half. Get a good crease; you will need it later.

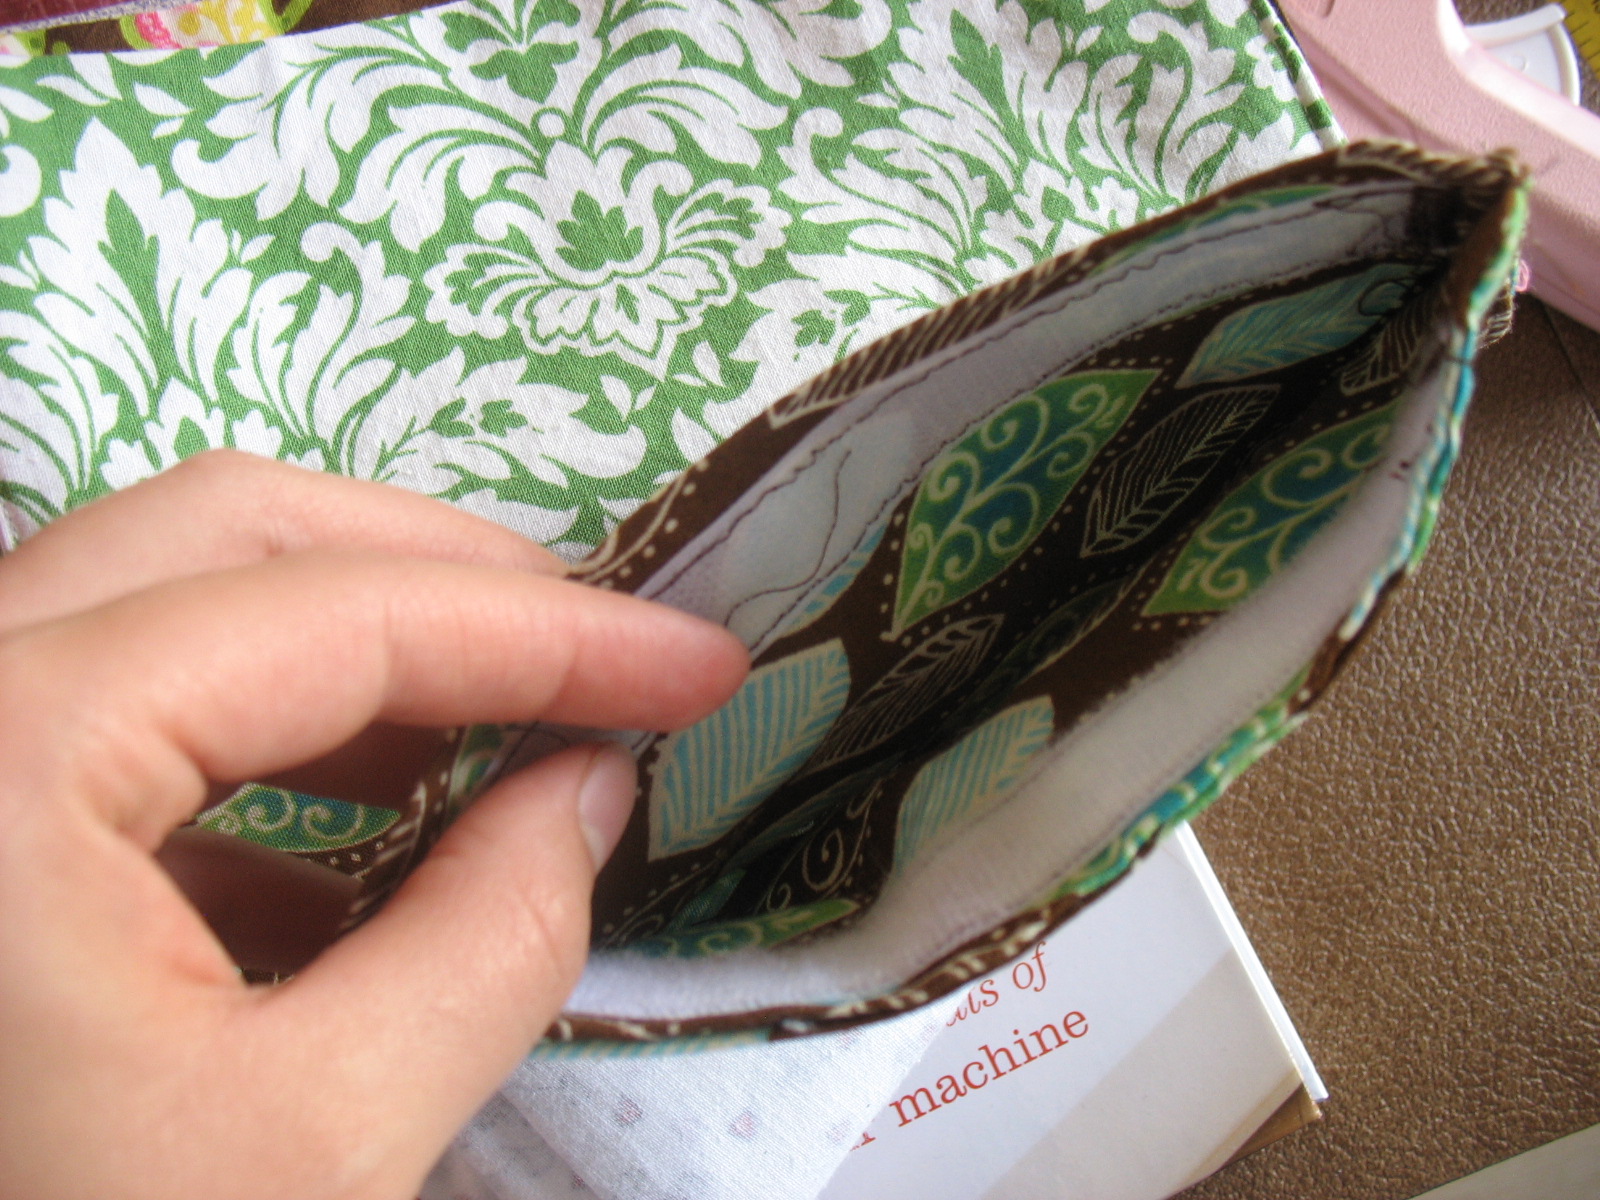
Step 11: If you want a coin pocket, sew the Velcro in 1/4″ or so down from the top of the pocket. This is a video on sewing on Velcro.
 The finished coin pocket.
Making the Body of The Wallet
First, you will need to make your pattern from paper. I accidentally did not cut my exterior piece long enough (as shown in the picture below), but I have adjusted the instructions to make it work for you.
Note: The pattern you will be making from paper WILL NOT include seam allowance, but I will explain that in a bit.
Step 1: To make the triangular part, I traced a 2″ (or so) circle in the center of a piece of paper 8 1/2″ wide. The bottom of the circle was on the edge of the paper.

Step 2: I then drew a line from the bottom corners of the paper to the horizontal center.

Step 3: Cut it out.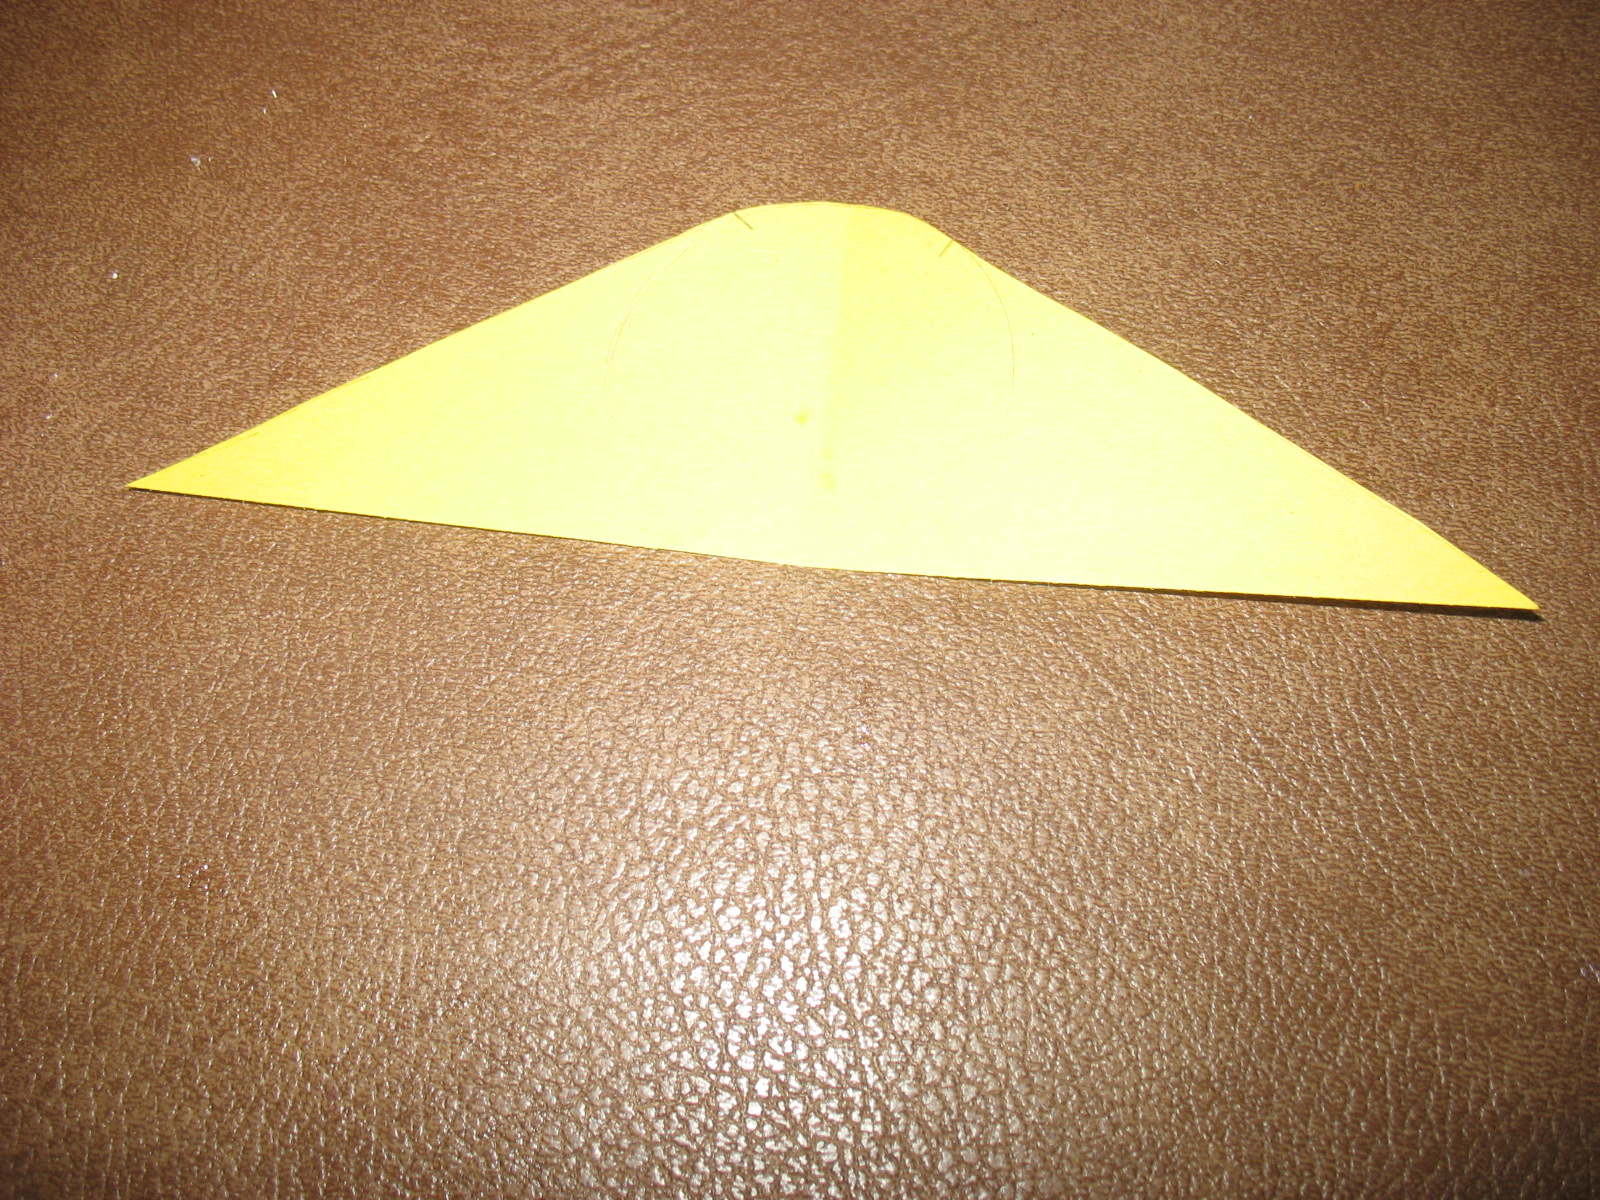
Step 4: Tape (or staple if *cough* that’s all you can find) the triangular piece to a piece of paper that is 11″ by 8 1/2″
Step 5: Cut out a piece of denim or other hefty-duty fabric using the resulting pattern.

Step 6: Fold your exterior fabric so that the right sides face together and iron.
Step 7: Pin the denim to your exterior fabric and cut at least 1/4″ away from the denim on all sides. You will have two pieces.

Step 8: Unpin the denim fabric and REPIN to just one piece of your exterior fabric. Set the other to the side. We will call the piece with the denim A and the other B.
Step 9: Sew the denim onto Piece A.

Sewing the Envelopes
It is time to sew the envelopes onto the denim/exterior bit. This is the most fun part!
Step 1: Find the vertical center of the rectangular part (i.e., not the triangular part) of piece A.
Step 2: From the center, measure 1″ closer to the STRAIGHT edge of Piece A, and mark in a couple of places. This is where you will sew the first envelope!
Step 3: Lay whichever square you want in the center on the pretty cotton side of Piece A, still folded, using the marks you just made. Make sure it is straight, or you may cry.
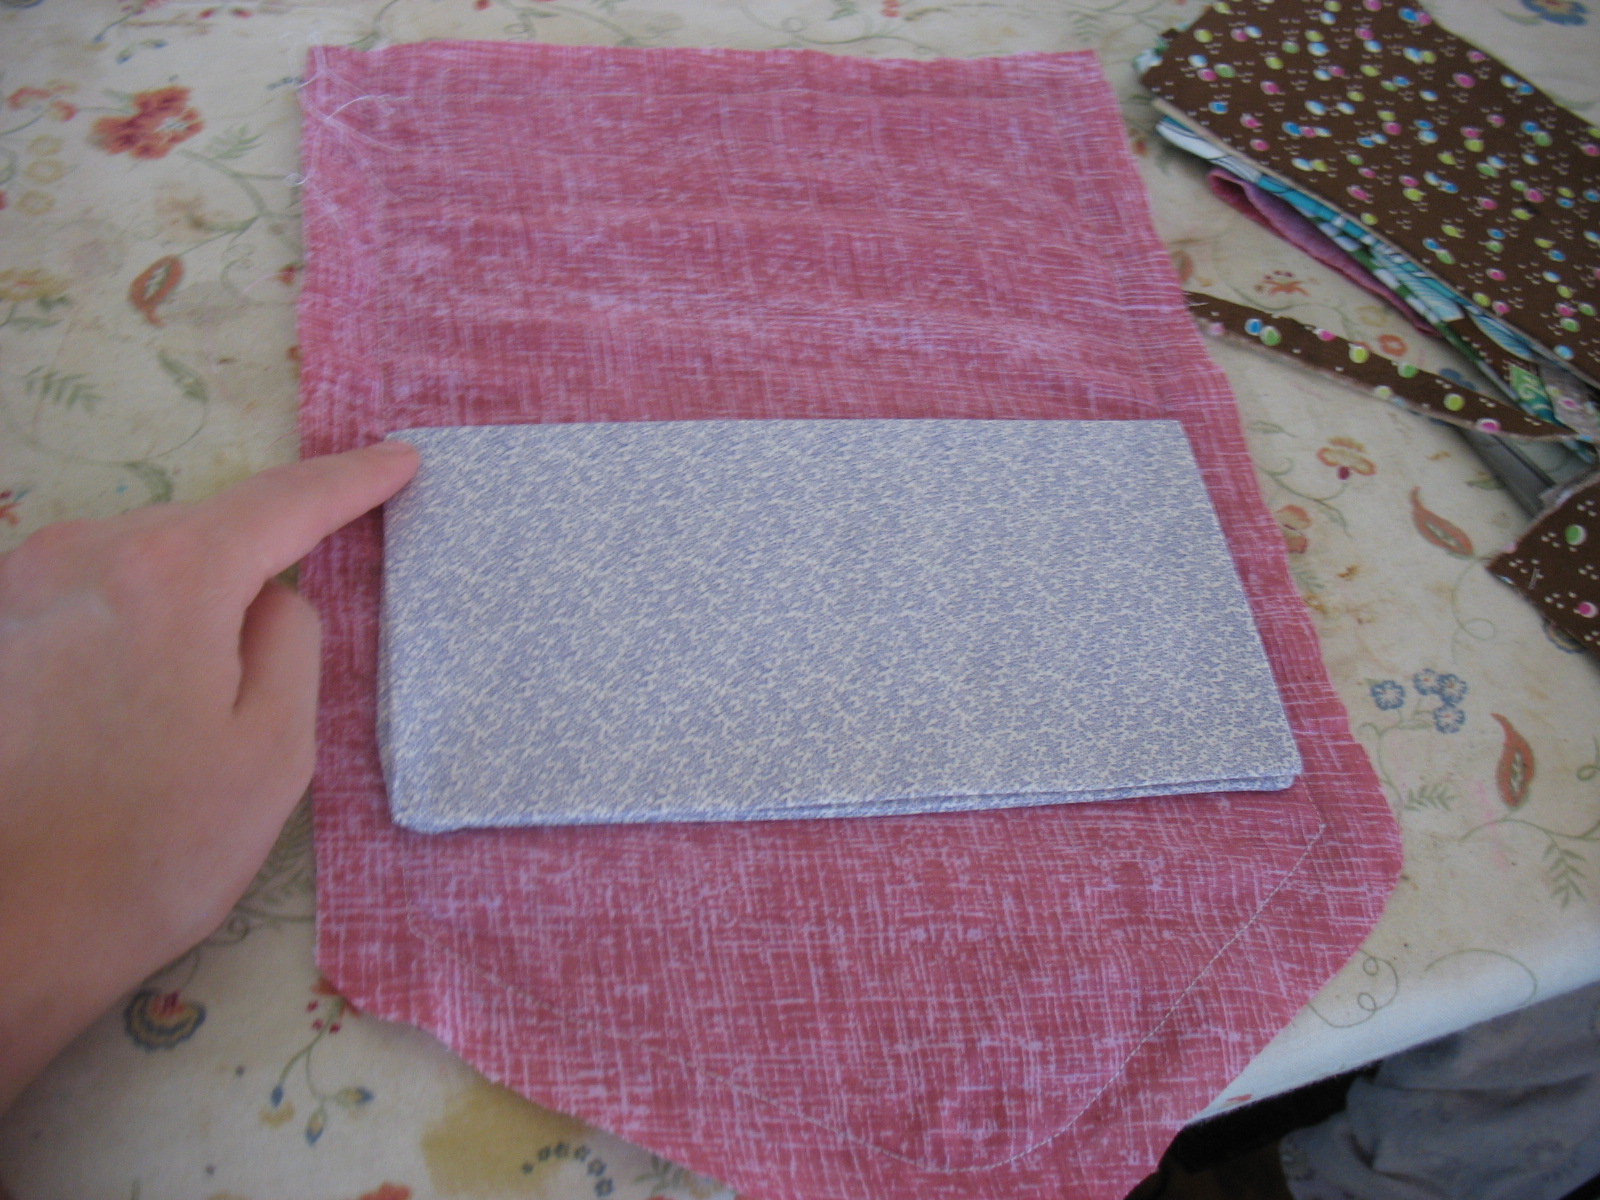
Step 4: Gently (as in, don’t yank it) unfold the square and pin it in place.
Step 5: Sew along that lovely crease you made earlier.

Step 6: You will now sew on all the over pre-envelopes. You will do half on one side of the one you just sewed and half on the other.
Step 7: Lay the folded edge of your envelopes as near the base of the other envelopes as you can, pin the side that is not next to an envelope, and sew along the crease.


Step 8: Repeat with all the squares. The denim side will have a series of seams very close together.

Step 9: Top stitch the sides of your envelopes together.

Note: I plan on eventually labeling the envelopes, bI ut have not figured out how I want to do it. You can print on fabric, though, so I might see if I know someone with a jet printer I can borrow, then just sew the labels on the outside.
Finishing The Body of the Wallet
Step 1: With the right sides facing together, pin Piece A and B together from where the envelopes are attached on Piece A to the tip.
Step 2: Using the edge of the denim as a guide, stitch together just from the envelopes to the tips!

Step 3: Pin the bottom part of pieces A and B together and sew again using the denim as a guide. The bottom half of both sides will be open.
Step 4: Turn out.
Step 5: Fold under the two opened sides and pin.
Step 6: Top stitch using 1/8″ seam allowance along the entire edge of the wallet. You will have to tilt the envelope system up to stitch where the envelopes are attached.
Finishing Up!
Now, all that needs to be done is the button and elastic.
Step 1: Sew the two ends of a 20″ piece of elastic string to the tip of the wallet.
Step 2: Sew a large button over the ends of the elastic.

Step 3: Knot the elastic loop to have a piece that will fit snugly around the button.

That’s it, folks! Now you get to fill it…


I’m so glad to see this Debra. My family is starting to use the cash-system method and this looks like a perfect way to keep us more organized! Thank you!!
I hope it works for you! I took it shopping for the first time the other day and loved it!
Very cute, Debra! I haven’t sewn in anything in a LONG time, but I just might have to get my sewing machine out for this project 🙂 LOVE it! You did a great job on the tutorial too – thanks 🙂
Someone commented that there were coupon books you could get for not very much. I’ve never seen them, but they might be something to look into.
Ooops! That was meant for someone else. Thank you! I actually have not sewed in a while, then I made this. So, I guess it’s a good project to get the sewing machine out for.
Debra, this is FABULOUS!!! 🙂 I love it! I especially love the picture of you at the end! 🙂 🙂
I really wish mine had the coin purse. That’s just stinkin’ genius.
What a great idea! I’ve never even seen those.
Sorry! That comment was for someone else. I am having issues today. Thank you stacy! Your so sweet and encouraging. I LOVE the coin pocket. I think I did a little dance when I thought to do it.
How adorable! I will have to put this on my list of things to make this summer once I am working less. Thanks for the great tutorial!
Great DIY tutorial. You got a manly version?
Ummm… not really. Make it out of a manly or neutral fabric and secure it with a snap or clip?
Very cute…I made some last year and absolutely love them, I used magnetic closings instead of velcro. I use them all the time! I also picked out fabrics that went with my category, like cupcakes for gifts, strawberries for food, etc. http://joshuaandstephanie.blogspot.com/2011/12/my-very-own-cloth-cash-envelopes.html
[…] DIY Cash-System Wallet Tutorial by Debra (contributing writer at Modern Alternative Mama): I love staying out of debt and Dave Ramsey recommends using cash with an envelope system. I don’t like the envelopes because my two Littles are always tugging on me in the grocery store. If I could figure out how to thread a bobbin, I think I would be sewing this asap. Share this:Like this:LikeBe the first to like this post. […]
Im obliged for the post.Thanks Again. Will read on…
[…] you don’t have extra cash (and are better at sewing than I am!), you can find a Tutorial to make your own Cash Envelope Wallet at Modern Alternative Mama. And, it looks like she has a pretty cool […]
WOW thanks you rocked it i was looking and looking and finally found the perfect cash envelopes.
thanks so much for posting it. I will try my best to do you proud.
Barbara Perez Kissimmee, Florida.
I just finished this and love, love, love it!!!!
However, not being a fan of sewing (I only sew what I really want/love) and the fact this took me a good 4-6 hours (really 12-14 hours over two days because of my 3 month old and toddler), I’ll probably never venture this route again! I’ll just pay someone. 😉
One tip I have to suggest, you said you cut the bottom too short and made allowance for it…I really think the top “envelope” closure could be longer. Maybe two inches or more so the rounded tip comes down halfway.
Thanks for sharing…I can’t wait until payday to stop using paper to seperate and confuse me with our money!!!
Just made mine last night. Took me several hours but now that I know what I’m doing, it won’t take as long. I showed the ladies in my Sunday School class and one already asked me to make one for her daughter in law…lol. Turned out super cute and the change pocket is GENIUS!!!
This might be a silly question but you say to use the “heavy duty material”. I assume this isn’t seen once put together? Was trying to look at pictures but couldn’t tell myself.
Cash is king, can’t wait to get organized.